MATLAB Command Line
Click to copy the following command line to the clipboard. Then paste it in the MATLAB Command Window:
edit hil_write_example.mHIL Write Example
This example writes immediately to 4 analog output channels, and all 16 digital I/O channels.
System Requirements
This example requires hardware supported by the HIL command set, such as the Q4 or Q8 hardware-in-the-loop card. Furthermore, the card must support immediate writes to multiple types of channels.
Configuring the example
To set up the example for your data acquisition card, edit the M-file and change
the board_type to the type of board being used. If you have more than
one of these data acquisition cards in your machine, then also change the board_identifier
variable to refer to desire board. Board identifiers are typically equal to the
board number, with the first board being board '0', the next board being board '1',
etc.
If your board does not support four analog output channels, then change the channels
variable to a vector of the appropriate number of channels. Use an empty matrix if the board does not
support analog channels at all. Do likewise for the other channel types.
Running the example
Simply type the name of the example, hil_write_example, at the
Matlab command prompt to run the example. It will write -1.5 V to analog channel 0,
-0.5 V to analog channel 1, +0.5 V to analog channel 2 and +1.5 V to analog channel 3.
It will also write the hexadecimal number 0x4321 to the digital outputs, with the
least significant bit being written to channel 0. A voltmeter must be used to read
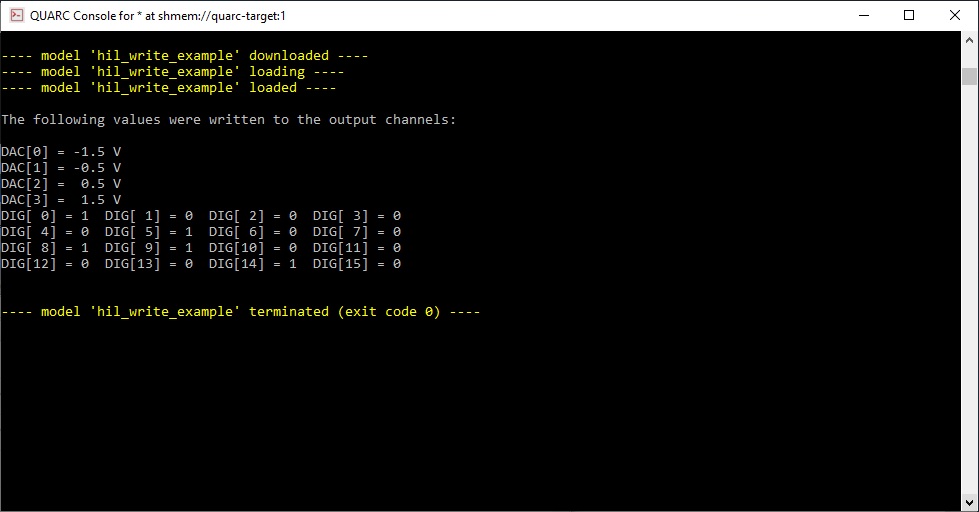
the analog and digital outputs. The output from the example looks like:
The following values were written to the output channels:

DAC[0] = -1.5 V
DAC[1] = -0.5 V
DAC[2] =  0.5 V
DAC[3] =  1.5 V
DIG[ 0] = 1  DIG[ 1] = 0  DIG[ 2] = 0  DIG[ 3] = 0
DIG[ 4] = 0  DIG[ 5] = 1  DIG[ 6] = 0  DIG[ 7] = 0
DIG[ 8] = 1  DIG[ 9] = 1  DIG[10] = 0  DIG[11] = 0
DIG[12] = 0  DIG[13] = 0  DIG[14] = 1  DIG[15] = 0
Building code from the example
To build real-time code from the example for the QUARC Win64 target, execute the following command in the MATLAB Command Window:
qc_build_script('hil_write_example', 'win64');
The command may also be entered in this form:
qc_build_script('hil_write_example.rt-win64');
The qc_build_script command generates a build script called 'hil_write_example_build.m'
and a main C file called 'hil_write_example_main.c'. It then invokes the build script to
generate C code for the MATLAB script and to compile and link it into a QUARC executable called 'hil_write_example.rt-win64'.
Running qc_build_script again will not overwrite the generated files, so they may be modified and
the changes will be incorporated when qc_build_script is run again.
Running the generated executable
Before running the generated executable, open a QUARC Console so that the output of the executable may be seen. The QUARC Console need only be opened once. Use the command:
qc_script_console('hil_write_example.rt-win64', 'all');
The QUARC Console shows the standard output from any QUARC executable that is run on the target (since the 'all' option was specified).
To run the generated executable, type the following command in the MATLAB Command Window:
qc_run_script('hil_write_example.rt-win64');
The output from the executable will be seen in the QUARC Console:

Building code for a different target
Before building the code for a new target, change the board type to suit the board connected to the new target.
In this case, a QUARC Linux Pi 3 target is used, so a Q2-USB (q2_usb) may be used. For the Q2-USB,
the analog_channels vector will need to be changed from 0:3 to 0:1 since
the Q2-USB only has two analog outputs. Also, the digital_channels vector will need to be changed
from 0:15 to 0:7 since it only has eight digital I/O channels.
To build real-time code from the example for the QUARC Linux Pi 3 target, execute the following command in the MATLAB Command Window:
qc_build_script('hil_write_example', 'linux_pi_3', 'update');
The command may also be entered in this form:
qc_build_script('hil_write_example.rt-linux_pi_3', 'update');
The 'update' option causes the qc_build_script command to update the
target type in the build script without rewriting the rest of the script. Hence, even if the script
has been modified, the changes will be preserved. Only the target type will be changed. The command
will then generate the C code for the MATLAB script and compile and link it for the new target type
to produce the executable 'hil_write_example.rt-linux_pi_3'.
Running the generated executable on the new target
Before running the generated executable, open a QUARC Console so that the output of the executable may be seen. The QUARC Console for this new target need only be opened once. Use the command:
qc_script_console('hil_write_example.rt-linux_pi_3', 'all');
The QUARC Console shows the standard output from any QUARC executable that is run on the target (since the 'all' option was specified). Note that even though the QUARC Console is running on the host PC, it will be showing the standard output from QUARC executables run on the QUARC Linux Pi 3 target!
To run the generated executable, type the following command in the MATLAB Command Window:
qc_run_script('hil_write_example.rt-linux_pi_3');
The output from the executable will be seen in the QUARC Console.
Copyright ©2025 Quanser Inc. This page was generated 2025-11-01. Submit feedback to Quanser about this page.
Link to this page.