MATLAB Command Line
Click to copy the following command line to the clipboard. Then paste it in the MATLAB Command Window:
quarc_qnx_target_demo_model_1; quarc_qnx_target_demo_model_2Running Models using the QUARC QNX x86 Target
This example demonstrates how to run models using the QUARC QNX x86 target. The QUARC QNX x86 Target is a hard real-time target for the QNX Neutrino operating system. This example consists of two demonstrations; the first demonstration showcases running one model on the QNX x86 target. The second demonstration showcases steps required to run multiple models on this target. We have used two simple models for this example which are shown in the following figures.
System Requirements
This demonstration is run using the QUARC QNX x86 target. To use QUARC for QNX x86, a separate PC with QNX Neutrino for x86 installed must be available.
In addition, QNX Momentics x86 cross-hosted development tools for Windows host environment must be installed on the host Windows machine where the Simulink diagrams are developed and the real-time code is generated.
For a detailed discussion on the QUARC QNX x86 target and requirements needed to run models on this target, please refer to the QUARC QNX Target reference page.
Configuring the Demonstration
Open the QUARC Preferences dialog by selecting from the menu of one of the Simulink diagrams.
Select qnx_x86 as the Target type on the Model pane. Then change the IP address
in the Default model URI parameter to match your QNX machine. For example, if your QNX machine
has an IP address of 172.16.0.155, then the Default model URI should be
tcpip://172.16.0.155:17001
.
A hostname may be used instead of the IP address if the QNX machine is configured
with a hostname. The IP address of the QNX machine is shown on the login screen
if Photon is enabled, or may be determined using the /sbin/ifconfig command otherwise.
The concept of URI's and their use in communications is discussed in
Communicating with the Target .
In this example, communications between Simulink and the model
will occur using TCP/IP. This step configures the default communications
scheme used with the QNX x86 target and does not have to be repeated unless the
address of the QNX machine changes.
Demonstration 1 - Running One Model using the QUARC QNX x86 Target
This demonstration illustrates how to run a single model on the QUARC QNX x86 target. The model to be used in this section is the quarc_qnx_target_demo_model_1.mdl Simulink diagram.
Once in the model window, open the Configuration Parameters dialog box by pressing Ctrl+E or choosing the menu item.
Click on the Code Generation pane in the tree-view on the left. In the Target Selection section, browse through the TLC files and select the quarc_qnx_x86.tlc file as the System target file.
In the Interface section of the Code Generation pane, there is a parameter called the MEX-file arguments. This is where you explicitly define a model URI to be used. If you do not specify a model URI in this
parameter's field, the default model URI will be used for the model. The default model URI has already been set using the QUARC Preferences
dialog in the Configuring the Demonstration section. Therefore, for this model, tcpip://qnx-machine:17001 will be used
as the model URI ("qnx-machine" should be replaced with the IP address of your QNX machine as mentioned earlier). For more information
on the MEX-file arguments parameter, please refer to the
MEX-file arguments reference section.
Click on Apply and OK.
Select from the menu of the diagram, or press Ctrl+B while the diagram is the active window. A great deal of output will appear in the Diagnostic Viewer about the progress of the build. If you cannot see the Diagnostic Viewer, you can open it by selecting from the menu of the diagram, or clicking on the View Diagnostics hyperlink at the bottom of the diagram. If you have MATLAB R2013b or earlier then the output will appear in the MATLAB Command Window.
Double-click on the "Model #1 Scope" block to display the sine wave.
Click on the button or select from the menu of the diagram to connect to the model.
Start the model by clicking on the button or selecting from the menu of the diagram. The item of the menu may also be used to both connect and start the model in one operation.
The "Model #1 Scope" block will trace a signal similar to the following figure.
Click on the button or select from the menu of the diagram to stop the model. The item of the menu may also be used.
Demonstration 2 - Running Multiple Models using the QUARC QNX x86 Target
This demonstration illustrates how to run multiple models on the QNX x86 target. We will use the quarc_qnx_target_demo_model_1.mdl model as well as the quarc_qnx_target_demo_model_2.mdl model for this demonstration.
Open the Configuration Parameters dialog box for model #1 by pressing Ctrl+E or choosing the menu item.
Click on the Code Generation pane in the tree-view on the left. In the Target Selection section, browse through the TLC files and select the quarc_qnx_x86.tlc file as the System target file.
Repeat the above step for model #2 as well.
Referring to the Configuring the Demonstration section, you have already set the default model URI for your QNX x86 target. One of your models will be using this model URI to communicate with the real-time code running on the target. The other model cannot use the same port number to communicate with its real-time code as ports cannot be shared between multiple connections. Therefore, you need to change the MEX-file arguments parameter of one of the models to explicitly define the model URI and change the port number. In this demonstration, this parameter is modified for model #2.
Open the Configuration Parameters dialog for model #2. Navigate to the Code Generation pane and select the Interface section from the tree-view on the left of the dialog.
Add the following line segment to the MEX-file arguments parameter's field:
'tcpip://qnx-machine:17002'
The "qnx-machine" should be replaced with the IP address for your QNX machine. The IP address should be identical to the one set for the default model URI. Note that this string should be separated from the default string by a comma.
Click on Apply and OK.
Select from the menu of the diagram, or press Ctrl+B while the diagram is the active window. A great deal of output will appear in the Diagnostic Viewer about the progress of the build. If you cannot see the Diagnostic Viewer, you can open it by selecting from the menu of the diagram, or clicking on the View Diagnostics hyperlink at the bottom of the diagram. If you have MATLAB R2013b or earlier then the output will appear in the MATLAB Command Window.
Double-click on "Model #1 Scope" and "Model #2 Scope" blocks to display the sine wave and the square wave respectively.
Click on the button or select from the menu of each of the diagrams to connect to the models.
Start the models by clicking on the button or selecting from the menu of each diagram. The item of the menu may also be used to both connect and start the model in one operation.
The Scope blocks will trace two signals similar to the following figures.
Click on the button or select from the menu of each diagram to stop the models. The item of the menu may also be used.
Each time you want to run an extra model on your QNX x86 machine, you have to define its model URI explicitly and have a different port number for the new model.
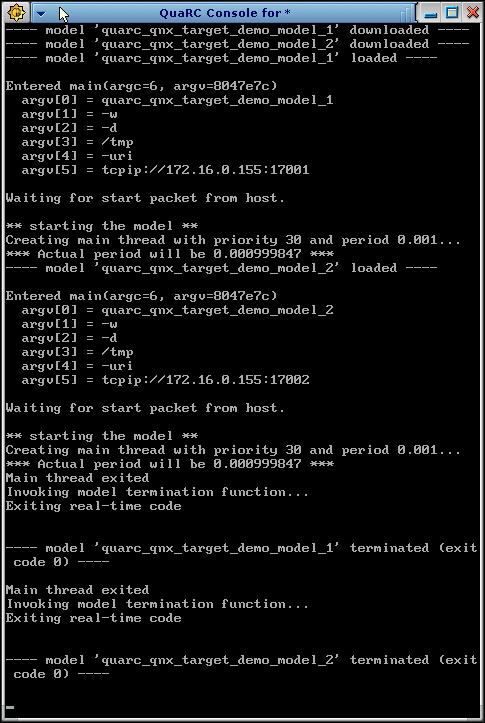
One of the features supported by the QUARC QNX x86 target is the QUARC console. The QUARC console is a tool you can use to monitor a model's standard I/O. For a detailed discussion of this tool, please refer to the QUARC Console - Model Standard I/O reference section.
You can run the QUARC console on the QNX x86 target by clicking on the Launch button at the bottom left corner of the display for the QNX machine and choosing the menu item.
If you open the QUARC console on the QNX x86 machine and run the above demonstration (demonstration #2), the console window will be similar to the following illustration.
Copyright ©2026 Quanser Inc. This page was generated 2026-05-13. Submit feedback to Quanser about this page.
Link to this page.