
Devices API
The Devices API is used to access specialized devices such as LIDAR, LCD displays and LED strips on a target using C/C++ based applications. The QUARC Devices API allows users to read LIDAR scans, display text and images on LCD displays and control LED strips from their application.
This section is a guide on how to use the QUARC Devices API to access specialized devices on a target. Before going into details, a set of steps are required to setup your C/C++ application to use the Devices API. Please use the following list to refer to each topic:
Setting Up the C/C++ Application to Use the Devices API
The user needs to follow a set of steps to setup the C/C++ application to use the Devices API. We assume that the Microsoft Visual Studio 2015 or later version is being used to develop the application. Please perform the following procedure to setup your application, once in the Microsoft Visual Studio environment:
Open the Property Pages window by right-clicking on the project containing your application and choosing the menu item in the context menu. The following figure illustrates this window.
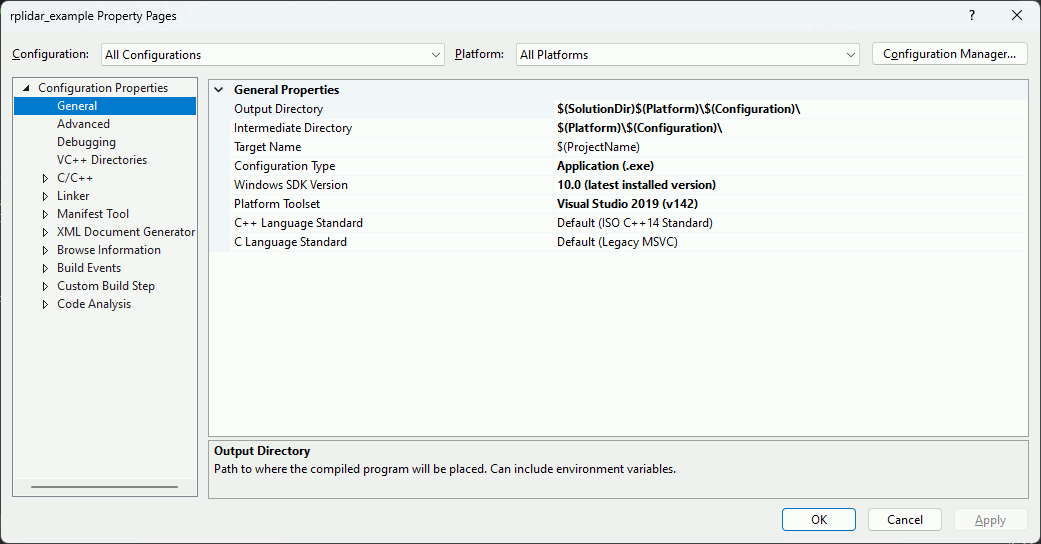
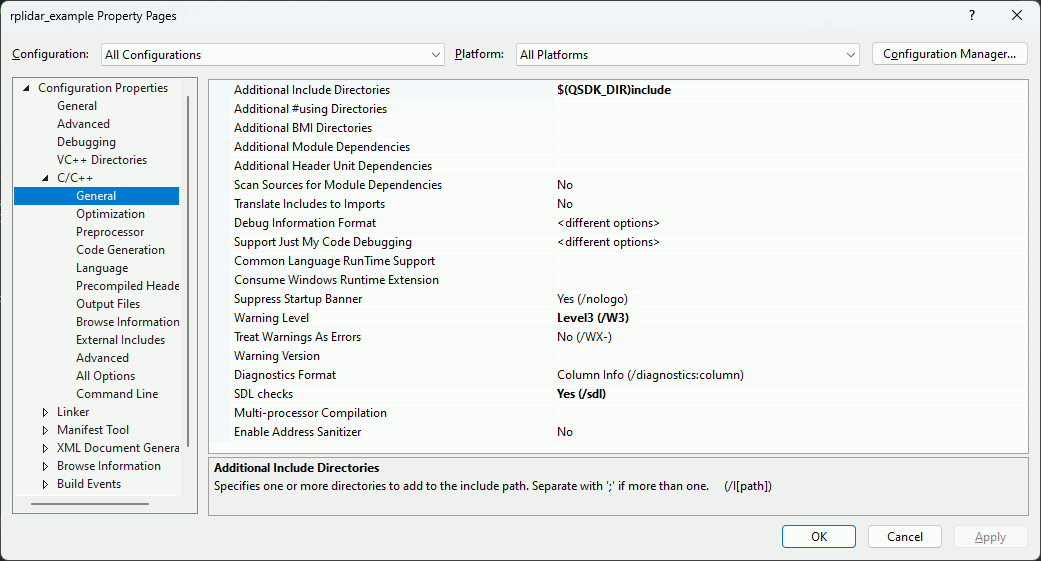
In the Property Pages window, click on the C/C++ pane. The first parameter
in this pane is called Additional Include Directories. Type in $(QSDK_DIR)include in
its field as shown in the figure below. Note that QSDK_DIR is an environment variable referring to the directory in which
QUARC has been installed.
Click on the Linker pane and expand its treeview. In the General section of this pane, there is a parameter
called Additional Library Directories. For the Win32 platform, type in $(QSDK_DIR)lib\windows
in its field as shown in the figure below. For the x64 platform, use $(QSDK_DIR)lib\win64 instead, since the
code must be linked with 64-bit versions of the QUARC libraries in that case.

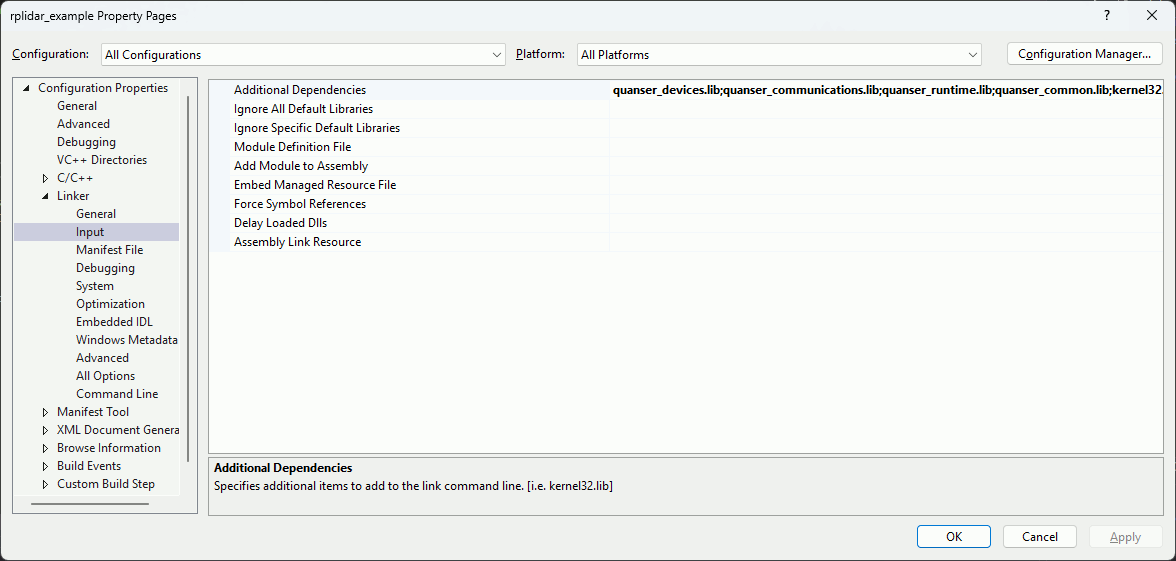
While in the Linker pane, click on the Input section. The first parameter in this section is called
Additional Dependencies. Add
quanser_devices.lib;quanser_communications.lib;quanser_runtime.lib;quanser_common.lib
to the start of the field as illustrated in the following figure. Note that the entries in the field should be separated semicolons.
Once all these changes are made, click on Apply and then OK.
LCD Display
The Devices API contains a set of functions for writing to LCD displays. These functions are listed below:
Sharp LS027B7DH01 LCD Display:
Surenoo WS0010-based OLED Display (such as Surenoo SOC1602A):
We use a C++ application to demonstrate how to use these functions to write to a Surenoo OLED Display.
Before going into the details of the source code for our example, remember to include the header files containing the functions used in your code. The header files included by the example are listed in the table below.
|
Header File |
Description |
|---|---|
|
|
Contains the prototypes for the LCD display functions. |
|
|
Contains prototypes for error handling functions that are portable across all Quanser targets. For more information about this API, please refer to the Error Handling section. |
|
|
Contains prototypes for signal handling functions that are portable across all Quanser targets, and are used in the example for catching Ctrl+C. |
|
|
Contains prototypes for timer functions that are portable across all Quanser targets. Only the qtimer_sleep function is used by the example. |
The required header files are grouped into a common header file called pch.h in this example. The contents of this
header file are:
    #include <stdio.h>
    #include "quanser_messages.h"
    #include "quanser_signal.h"
    #include "quanser_lcd_display.h"
    #include "quanser_timer.h"
The following description highlights only portions of the example code to better explain how the example works, rather than include all the code here. For example, the following code snippet establishes a signal handler that catches Ctrl+C so that the application can be terminated gracefully when pressing Ctrl+C rather than terminating it forcefully.
    static int stop = 0;

    void signal_handler(int signal)
    {
        stop = 1;
    }

    int main(int argc, char * argv[])
    {
        qsigaction_t action;

        action.sa_handler = signal_handler;
        action.sa_flags = 0;
        qsigemptyset(&action.sa_mask);

        qsigaction(SIGINT, &action, NULL);
        ...
    }
To open the OLED display, the following call is made:
    t_ws0010 display;

    /* Open the Surenoo WS0010-based OLED display */
    result = ws0010_open("spi://localhost:0?baud=2e6,word=10,polarity=1,phase=1,frame=56", false, &display);
    if (result >= 0)
    {
        ...

        /* Close the display */
        ws0010_close(display);
    }
The URL determines the communication interface for the display being used. The "spi:" scheme indicates the SPI protocol. The hostname of "localhost" indicates that the device is local to the current machine and the port of 0 indicates that the device is connected to SPI port 0.
The second parameter of false puts the display in text mode rather than graphics mode.
Finally, the address of a t_ws0010 variable is passed, which will be initialized with the handle to the OLED display upon successful return from the function. The handle should be closed when it is no longer needed using ws0010_close.
Text is printed to the display using the ws0010_print function (or ws0010_wprint to use wide Unicode characters), as shown below. Since it can support graphics, a bitmap may be drawn to the display using the ws0010_draw_image function if the display is opened in graphics mode.
    /* Print a portion of the "Hello world!" message on the first line starting at the given column. */
    result = ws0010_print(display, 0, column, &message[offset], ARRAY_LENGTH(message));
The result is the number of code units written or a negative error code.
Finally, the code snippet below prints out an error message for any error that may have occurred in the process of writing to the OLED display:
    /* Print the appropriate message in case of errors. */
    if (result < 0)
    {
        char message[1024];
        msg_get_error_messageA(NULL, result, message, ARRAY_LENGTH(message));
        printf("ERROR: Unable to write to the OLED display. %s\n", message);
    }
You can now build your application. Before running the application, make sure that you have a Surenoo WS0010-based OLED display, such as the Surenoo SOC1602A, connected (if one is not built in).
The other functions are for more advanced functionality, such as rotating the display, changing to dark mode, defining custom characters or mixing graphics and text at the same time.
LED Strip
The Devices API contains three functions for driving a Kingbright AAAF5050-MC-K12 LED strip. These four functions are listed below:
We use a C++ application to demonstrate how to use these functions to drive the LED strip.
Before going into the details of the source code for our example, remember to include the header files containing the functions used in your code. The header files included by the example are listed in the table below.
|
Header File |
Description |
|---|---|
|
|
Contains the prototypes for the LED functions. |
|
|
Contains prototypes for error handling functions that are portable across all Quanser targets. For more information about this API, please refer to the Error Handling section. |
|
|
Contains prototypes for signal handling functions that are portable across all Quanser targets, and are used in the example for catching Ctrl+C. |
The required header files are grouped into a common header file called stdafx.h in this example. The contents of this
header file are:
    #include "targetver.h"
    #include <stdio.h>
    #include "quanser_led.h"
    #include "quanser_messages.h"
    #include "quanser_signal.h"
The following description highlights only portions of the example code to better explain how the example works, rather than include all the code here. For example, the following code snippet establishes a signal handler that catches Ctrl+C so that the application can be terminated gracefully when pressing Ctrl+C rather than terminating it forcefully.
    static int stop = 0;

    void signal_handler(int signal)
    {
        stop = 1;
    }

    int main(int argc, char * argv[])
    {
        qsigaction_t action;

        action.sa_handler = signal_handler;
        action.sa_flags = 0;
        qsigemptyset(&action.sa_mask);

        qsigaction(SIGINT, &action, NULL);
        ...
    }
Writing to an LED strip basically involves setting the colour of each LED in the strip in a
single operation. The colour of each LED is represented by a t_led_color structure, which contains
three fields: red, green and blue. Each field is a t_uint8 allowing colour
component values from 0 to 255. An array of these structures is passed to the LED strip's write
function to set the colours of the LEDs.
For example, if there are four LEDs in the strip then the array would look like:
    t_led_color colors[4] = // Array of LED colours
    {
        { 255, 0, 0 }, // red
        { 0, 255, 0 }, // green
        { 0, 0, 255 }, // blue
        { 255, 0, 255 }, // magenta
    };
To open the LED strip, the following call is made:
    t_aaaf5050_mc_k12 led_strip;

    /* Open the Kingbright AAAF5050-MC-K12 LED strip */
    result = aaaf5050_mc_k12_open("spi://localhost:1?memsize=420,word=8,baud=3333333,lsb=off,frame=1", ARRAY_LENGTH(colors), &led_strip);
    if (result >= 0)
    {
        ...

        /* Close the LED strip */
        aaaf5050_mc_k12_close(capture);
    }
The URL determines the communication interface for the LED strip being used. The "spi:" scheme indicates that the LED strip is connected to an SPI port on the target. The Kingbright AAAF5050-MC-K12 LED strip functions assume an SPI port is being used. The hostname of "localhost" simply indicates that the device is local to the current machine and the port of 1 indicates that the LED strip is attached to SPI port 1.
The ARRAY_LENGTH(colors) is the number of elements in the colors array and indicates how many LEDs are in the
LED strip in this example.
Finally, the address of a t_aaaf5050_mc_k12 variable is passed, which will be initialized with the handle to the LED strip upon successful return from the function. The handle should be closed when it is no longer needed using aaaf5050_mc_k12_close.
Colors are written using the aaaf5050_mc_k12_write function as shown below.
    /* Set the LED strip colours */
    result = aaaf5050_mc_k12_write(led_strip, colors, ARRAY_LENGTH(colors));
The result is the number of LEDs written successfully or a negative error code.
Finally, the code snippet below prints out an error message for any error that may have occurred in the process of writing to the LED strip:
    /* Print the appropriate message in case of errors. */
    if (result < 0)
    {
        char message[1024];
        msg_get_error_messageA(NULL, result, message, ARRAY_LENGTH(message));
        fprintf(stderr, "ERROR: Unable to write to LED strip. %s\n", message);
    }
You can now build your application. Before running the application, make sure that you have a Kingbright AAAF5050-MC-K12 LED strip connected to an SPI port (if one is not built in). The application will set the colors of the first four LEDs to red, green, blue and magenta.
LIDAR
The Devices API contains functions for reading from LIDAR devices as well. These functions are listed below:
Leishen M10P LIDAR:
RPLIDAR LIDAR:
We use a C++ application to demonstrate how to use these functions to read from an RPLIDAR device.
Before going into the details of the source code for our example, remember to include the header files containing the functions used in your code. The header files included by the example are listed in the table below.
|
Header File |
Description |
|---|---|
|
|
Contains prototypes for error handling functions that are portable across all Quanser targets. For more information about this API, please refer to the Error Handling section. |
|
|
Contains prototypes for signal handling functions that are portable across all Quanser targets, and are used in the example for catching Ctrl+C. |
|
|
Contains the prototypes for the LIDAR functions. |
The required header files are grouped into a common header file called stdafx.h in this example. The contents of this
header file are:
    #include "targetver.h"
    #include <stdio.h>
    #include "quanser_messages.h"
    #include "quanser_signal.h"
    #include "quanser_ranging_sensor.h"
The following description highlights only portions of the example code to better explain how the example works, rather than include all the code here. For example, the following code snippet establishes a signal handler that catches Ctrl+C so that the application can be terminated gracefully when pressing Ctrl+C rather than terminating it forcefully.
    static int stop = 0;

    void signal_handler(int signal)
    {
        stop = 1;
    }

    int main(int argc, char * argv[])
    {
        qsigaction_t action;

        action.sa_handler = signal_handler;
        action.sa_flags = 0;
        qsigemptyset(&action.sa_mask);

        qsigaction(SIGINT, &action, NULL);
        ...
    }
To open the RPLIDAR device, the following call is made:
    t_ranging_sensor lidar;

    /* Open the RPLIDAR device */
    result = rplidar_open("serial://localhost:2?baud='115200',word='8',parity='none',stop='1',flow='none',dsr='on'", RANGING_DISTANCE_LONG, &lidar);
    if (result >= 0)
    {
        ...

        /* Close the RPLIDAR device */
        rplidar_close(lidar);
    }
The URL determines the communication interface to the LIDAR device being used. The "serial:" scheme indicates that the LIDAR is connected to a serial port. The hostname of "localhost" indicates that the device is local to the current machine and the port of 2 indicates that the RPLIDAR is connected to serial port 2.
The ranging distance configures the LIDAR for short, medium or long range operation as befits the application.
Finally, the address of a t_ranging_sensor variable is passed, which will be initialized with the handle to the RPLIDAR device upon successful return from the function. The handle should be closed when it is no longer needed using rplidar_close.
LIDAR scans are read using the rplidar_read function. Hence, a typical loop for capturing LIDAR data looks like:
    while (!stop)
    {
        static t_ranging_measurement measurements[1000];
        t_int num_measurements;
        ...

        /* Read one LIDAR scan into the provided buffer */
        num_measurements = rplidar_read(lidar, RANGING_MEASUREMENT_MODE_NORMAL, 0.0, 2*M_PI, measurements, ARRAY_LENGTH(measurements));
        if (num_measurements > 0)
        {
            ... process num_measurements samples from buffer ...
        }
    }
The rplidar_read function returns the number of LIDAR measurements on success or a negative error code. The rplidar_read function is non-blocking so it must be called periodically to get scans. It returns -QERR_WOULD_BLOCK if no new scan is available yet.
Finally, the code snippet below prints out an error message for any error that may have occurred in the process of reading a LIDAR scan:
    /* Print the appropriate message in case of errors. */
    if (result < 0)
    {
        char message[1024];
        msg_get_error_messageA(NULL, result, message, ARRAY_LENGTH(message));
        fprintf(stderr, "ERROR: Unable to read LIDAR scan. %s\n", message);
    }
You can now build your application. Before running the application, make sure that you have a video capture device connected (if one is not built in), such as a webcam. After 10 seconds the application will exit on its own. Otherwise, press Ctrl+C to exit the application prematurely.
Copyright ©2026 Quanser Inc. This page was generated 2026-05-13. Submit feedback to Quanser about this page.
Link to this page.