
Multimedia API
The Multimedia API is used to access multimedia devices such as cameras, microphones and speakers on a target using C/C++ based applications. The QUARC Multimedia API allows users to grab camera images from RGB or RGBD cameras, play audio waveforms or record sound from their application.
The audio functions of the Multimedia API are declared in the header file. Functions for RGB (2D) cameras are defined in the header file and functions for RGBD (3D) cameras are defined in the header file.
This section is a guide on how to use the QUARC Multimedia API to access multimedia devices on a target. Before going into details, a set of steps are required to setup your C/C++ application to use the Multimedia API. Please use the following list to refer to each topic:
Setting Up the C/C++ Application to Use the Multimedia API
The user needs to follow a set of steps to setup the C/C++ application to use the Multimedia API. We assume that the Microsoft Visual Studio 2015 or later version is being used to develop the application. Please perform the following procedure to setup your application, once in the Microsoft Visual Studio environment:
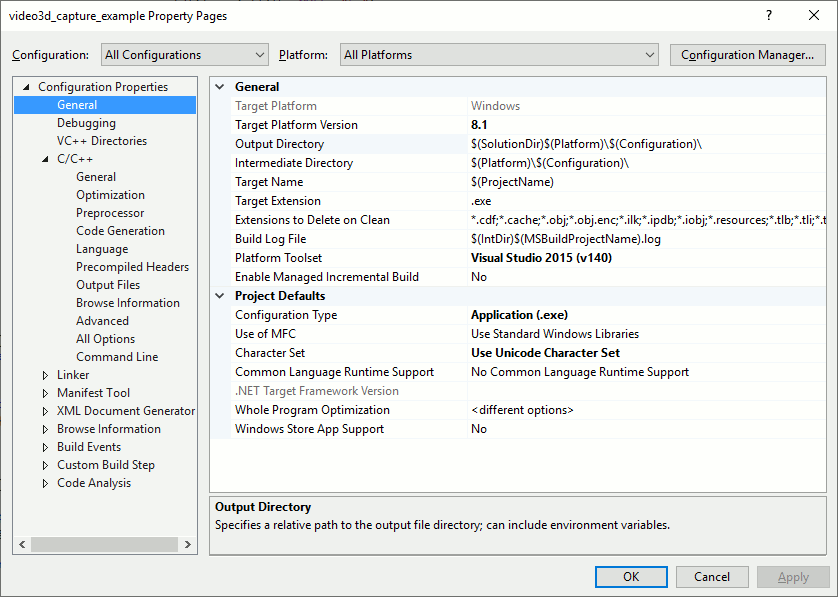
Open the Property Pages window by right-clicking on the project containing your application and choosing the menu item in the context menu. The following figure illustrates this window.
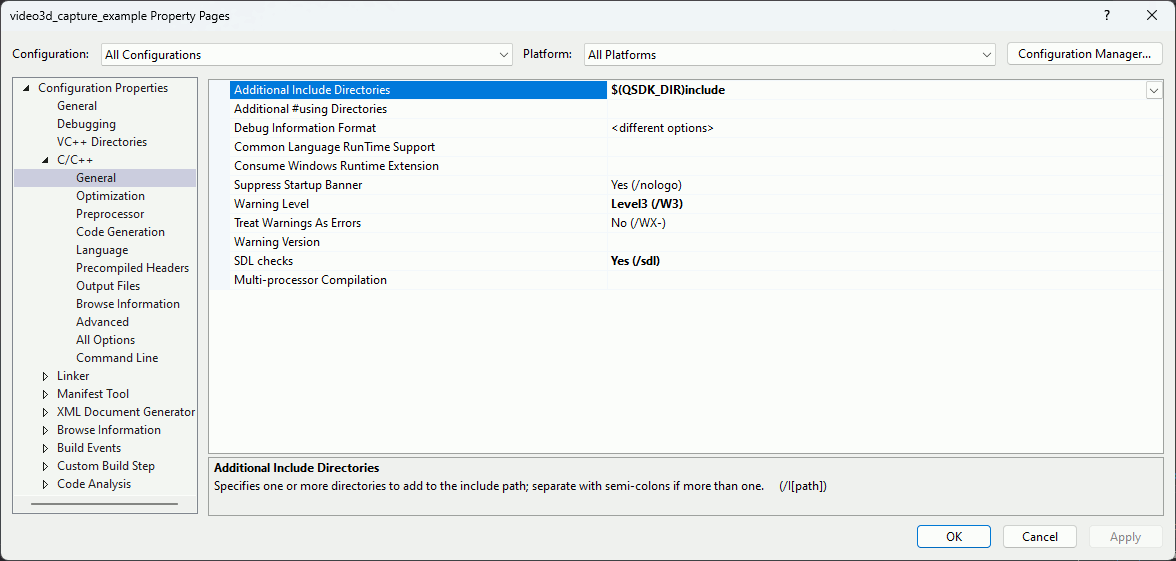
In the Property Pages window, click on the C/C++ pane. The first parameter
in this pane is called Additional Include Directories. Type in $(QSDK_DIR)include in
its field as shown in the figure below. Note that QSDK_DIR is an environment variable referring to the directory in which
QUARC has been installed.
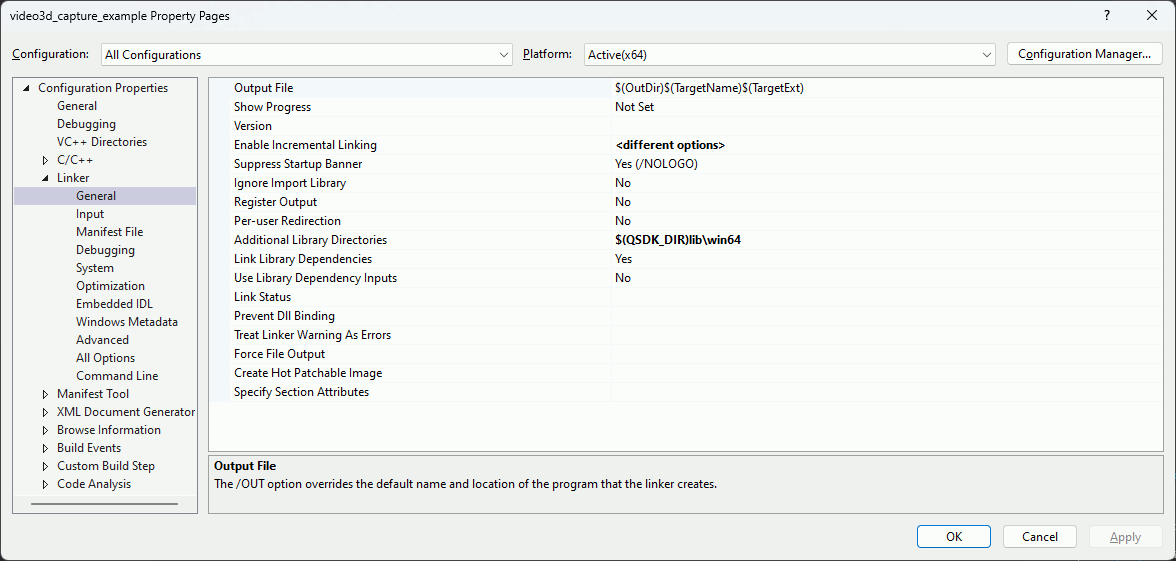
Click on the Linker pane and expand its treeview. In the General section of this pane, there is a parameter
called Additional Library Directories. For the Win32 platform, type in $(QSDK_DIR)lib\windows
in its field as shown in the figure below. For the x64 platform, use $(QSDK_DIR)lib\win64 instead, since the
code must be linked with 64-bit versions of the QUARC libraries in that case.
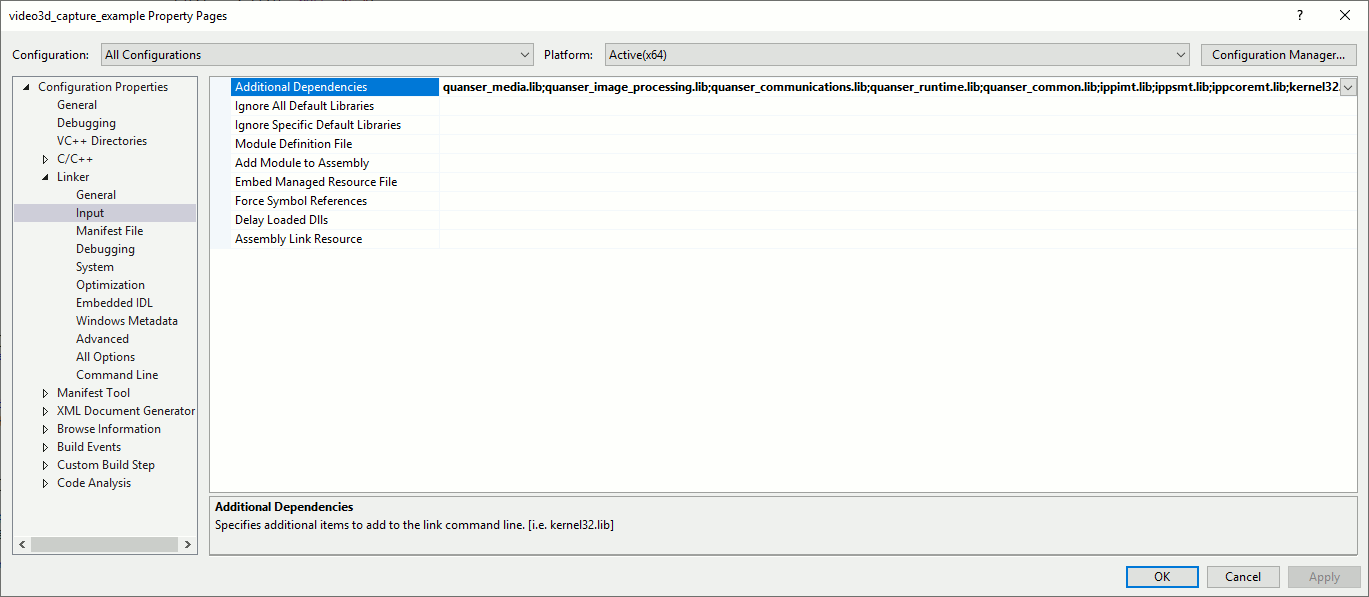
While in the Linker pane, click on the Input section. The first parameter in this section is called
Additional Dependencies. Add
quanser_media.lib;quanser_image_processing.lib;quanser_communications.lib;quanser_runtime.lib;quanser_common.lib;ippimt.lib;ippsmt.lib;ippcoremt.lib;
to the start of the field as illustrated in the following figure. Note that the entries in the field should be separated semicolons. The ipp libraries
are only required on Quanser targets using Intel processors such as Windows and QDrone.
Once all these changes are made, click on Apply and then OK.
Capturing Audio
The Multimedia API contains four functions for capturing audio in PCM format. These four functions are listed below:
audio_capture_open
audio_capture_read
audio_capture_trigger
audio_capture_close
We use a C++ application to demonstrate how to use these functions to capture audio from a microphone.
Before going into the details of the source code for our example, remember to include the header files containing the functions used in your code. The header files included by the example are listed in the table below.
|
Header File |
Description |
|---|---|
|
|
Contains the prototypes for the audio capture functions. |
|
|
Contains prototypes for generic file handling functions that are portable across all Quanser targets. |
|
|
Contains prototypes for error handling functions that are portable across all Quanser targets. For more information about this API, please refer to the Error Handling section. |
|
|
Contains prototypes for memory management functions that are portable across all Quanser targets. |
|
|
Contains prototypes for signal handling functions that are portable across all Quanser targets, and are used in the example for catching Ctrl+C. |
|
|
Contains prototypes for timer functions that are portable across all Quanser targets. Only the qtimer_sleep function is used by the example. |
The required header files are grouped into a common header file called stdafx.h in this example. The contents of this
header file are:
                #include "targetver.h"
                #include <stdio.h>
                #include "quanser_file.h"
                #include "quanser_memory.h"
                #include "quanser_messages.h"
                #include "quanser_signal.h"
                #include "quanser_timer.h"
                #include "quanser_audio.h"
The following description highlights only portions of the example code to better explain how the example works, rather than include all the code here. For example, the following code snippet establishes a signal handler that catches Ctrl+C so that the application can be terminated gracefully when pressing Ctrl+C rather than terminating it forcefully.
                static int stop = 0;

                void signal_handler(int signal)
                {
                    stop = 1;
                }

                int main(int argc, char * argv[])
                {
                    qsigaction_t action;

                    action.sa_handler = signal_handler;
                    action.sa_flags = 0;
                    qsigemptyset(&action.sa_mask);

                    qsigaction(SIGINT, &action, NULL);
                    ...
                }
Audio capture requires buffers for holding the sampled data, with one buffer for each channel. Each channel should contain enough space for the number of samples that will be collected at each time period. The buffers for all channels are provided as an array of buffer pointers, with one element in the array for each channel. Each element points to the buffer for that channel.
For example, if there are two channels then the buffer pointers will be stored in a two element array such as:
                t_single buffer0[4410]; // Buffer for channel 0 samples
                t_single buffer1[4410]; // Buffer for channel 1 samples
                t_single * buffers[2] = { buffer1, buffer2 }; // Array of buffers
In our example, however, we dynamically allocate an array so it is easier to change the number of samples or channels. The code snippet below is used to allocate and initialize the array of buffers:
                /* Allocate NUM_CHANNELS buffers for the audio samples, each buffer being num_samples long */

                samples[0] = (t_single *) memory_allocate(num_samples * sizeof(t_single) * NUM_CHANNELS);
                if (samples[0] != NULL)
                {
                    for (i = 1; i < NUM_CHANNELS; i++)
                        samples[i] = samples[i-1] + num_samples;
                    ...
                    memory_free(samples);
                }
For efficiency, the memory for all NUM_CHANNELS buffers is allocated in one shot in a single call to memory_allocate. That large buffer is then divided up between each of the channels in the for loop such that each buffer contains num_samples elements and there are NUM_CHANNELS buffers.
To open the audio capture device, the following call is made:
                /* Open the audio capture device */
                result = audio_capture_open("audio://localhost:0", sample_rate, NUM_CHANNELS, AUDIO_FORMAT_FLOAT, num_samples, AUDIO_CAPTURE_MODE_ONCE_AT_OPEN, &capture);
                if (result >= 0)
                {
                    ...

                    /* Close the audio capture device */
                    audio_capture_close(capture);
                }
The URL determines the audio device being used. The "audio:" scheme indicates that an actual audio device is being used, as opposed to a web or file URL. The hostname of "localhost" indicates that the device is local to the current machine and the port of 0 indicates that the first available audio capture device will be used.
The sample_rate is the frequency in Hz at which the audio samples will be captured, and is typically 44100 Hz or 48000 Hz, although other frequencies may be used. The AUDIO_FORMAT_FLOAT format is a single-precision floating-point sampled format where each sample is a t_single data type (equivalent to a float).
The AUDIO_CAPTURE_MODE_ONCE_AT_OPEN option indicates that audio samples will start being captured as soon as the device is opened. For devices, audio capture will continue until the capture session is closed, but for files this mode indicates that audio capture will stop as soon as the file has reached the end (as opposed to restarting at the beginning of the file).
Finally, the address of a t_audio_capture variable is passed, which will be initialized with the handle to the audio capture session upon successful return from the function. The session should be closed when it is no longer needed using audio_capture_close.
Audio samples are read using the audio_capture_read function as shown below.
                /* Capture any audio data available */
                result = audio_capture_read(capture, num_samples, samples);
                if (result < 0) /* then an error occurred */
                    break;
                else if (result > 0) /* then samples were available */
                {
                    ...
                }
The result is the number of samples read or a negative error code. If result is zero then no samples were available. The audio_capture_read function is non-blocking so it must be called periodically to get samples before the buffer overflows.
The timing of the loop is provided by the qtimer_sleep function. It sleeps until an absolute point in time so that any computation delays within the loop are accounted for. The basic timing paradigm is illustrated below:
                t_timeout timeout, interval;

                timeout_get_timeout(&interval, period); /* get the period as a t_timeout object */
                timeout_get_current_time(&timeout);     /* get the current time */

                while (!stop)
                {
                    /* Wait until the next interval */
                    timeout_add(&timeout, &timeout, &interval);
                    qtimer_sleep(&timeout);

                    ...
                }
The timeout functions get the current time (via timeout_get_current_time) and then compute the timestamp of the next point in time at which we wish to collect audio samples (via timeout_add). The qtimer_sleep function is called to wait until that absolute point in time.
Finally, the code snippet below prints out an error message for any error that may have occurred in the process of capturing audio samples:
                /* Print the appropriate message in case of errors. */
                if (result < 0)
                {
                    char message[1024];
                    msg_get_error_messageA(NULL, result, message, ARRAY_LENGTH(message));
                    printf("ERROR: Unable to capture audio samples. %s\n", message);
                }
You can now build your application. Before running the application, make sure that you have an audio capture device connected (if one is not built in), such as a headset with a microphone. As soon as the application begins to run, start talking and your voice will be recorded. After 10 seconds the application will exit on its own. Otherwise, press Ctrl+C to exit the application prematurely. The audio samples that have been collected will be stored in an M-script called audio_capture_example.m which can be run in MATLAB to replay the recorded audio.
Rendering Audio
The Multimedia API contains three functions for rendering audio. These functions are listed below:
audio_render_open
audio_render_write
audio_render_close
We use a C++ application to demonstrate how to use these functions to render audio to a speaker.
Before going into the details of the source code for our example, remember to include the header files containing the functions used in your code. The header files included by the example are listed in the table below.
|
Header File |
Description |
|---|---|
|
|
Contains the prototypes for the audio render functions. |
|
|
Contains prototypes for error handling functions that are portable across all Quanser targets. For more information about this API, please refer to the Error Handling section. |
|
|
Contains prototypes for memory management functions that are portable across all Quanser targets. |
|
|
Contains prototypes for signal handling functions that are portable across all Quanser targets, and are used in the example for catching Ctrl+C. |
|
|
Contains prototypes for timer functions that are portable across all Quanser targets. Only the qtimer_sleep function is used by the example. |
The required header files are grouped into a common header file called stdafx.h in this example. The contents of this
header file are:
                #include "targetver.h"
                #include <stdio.h>
                #include "quanser_memory.h"
                #include "quanser_messages.h"
                #include "quanser_signal.h"
                #include "quanser_timer.h"
                #include "quanser_audio.h"
The following description highlights only portions of the example code to better explain how the example works, rather than include all the code here. For example, the following code snippet establishes a signal handler that catches Ctrl+C so that the application can be terminated gracefully when pressing Ctrl+C rather than terminating it forcefully.
                static int stop = 0;

                void signal_handler(int signal)
                {
                    stop = 1;
                }

                int main(int argc, char * argv[])
                {
                    qsigaction_t action;

                    action.sa_handler = signal_handler;
                    action.sa_flags = 0;
                    qsigemptyset(&action.sa_mask);

                    qsigaction(SIGINT, &action, NULL);
                    ...
                }
Audio rendering requires buffers for holding the sampled data, with one buffer for each channel. Each channel should contain enough space for the number of samples that will be generated at each time period. The buffers for all channels are provided as an array of buffer pointers, with one element in the array for each channel. Each element points to the buffer for that channel.
For example, if there are two channels then the buffer pointers will be stored in a two element array such as:
                t_single buffer0[4410]; // Buffer for channel 0 samples
                t_single buffer1[4410]; // Buffer for channel 1 samples
                t_single * buffers[2] = { buffer1, buffer2 }; // Array of buffers
In our example, however, we dynamically allocate an array so it is easier to change the number of samples or channels. The code snippet below is used to allocate and initialize the array of buffers:
                /* Allocate NUM_CHANNELS buffers for the audio samples, each buffer being num_samples long */

                samples[0] = (t_single *) memory_allocate(num_samples * sizeof(t_single) * NUM_CHANNELS);
                if (samples[0] != NULL)
                {
                    for (i = 1; i < NUM_CHANNELS; i++)
                        samples[i] = samples[i-1] + num_samples;
                    ...
                    memory_free(samples);
                }
For efficiency, the memory for all NUM_CHANNELS buffers is allocated in one shot in a single call to memory_allocate. That large buffer is then divided up between each of the channels in the for loop such that each buffer contains num_samples elements and there are NUM_CHANNELS buffers.
To open the audio render device, the following call is made:
                /* Open the audio render device */
                result = audio_render_open("audio://localhost:3", sample_rate, NUM_CHANNELS, AUDIO_FORMAT_FLOAT, num_samples, &render);
                if (result >= 0)
                {
                    ...

                    /* Close the audio render device */
                    audio_render_close(capture);
                }
The URL determines the audio device being used. The "audio:" scheme indicates that an actual audio device is being used, as opposed to a web or file URL. The hostname of "localhost" indicates that the device is local to the current machine and the port of 0 indicates that the first available audio render device will be used.
The sample_rate is the frequency in Hz at which the audio samples will be rendered, and is typically 44100 Hz or 48000 Hz, although other frequencies may be used. The AUDIO_FORMAT_FLOAT format is a single-precision floating-point sampled format where each sample is a t_single data type (equivalent to a float).
Finally, the address of a t_audio_render variable is passed, which will be initialized with the handle to the audio render session upon successful return from the function. The session should be closed when it is no longer needed using audio_render_close.
Audio samples are written using the audio_render_write function as shown below.
                /* Render the audio samples */
                result = audio_render_write(render, num_samples, samples);
                if (result < 0) /* then an error occurred */
                    break;
                else if (result > 0) /* then samples were rendered */
                {
                    ...
                }
The result is the number of samples written or a negative error code. The audio_render_write function is non-blocking so it must be called periodically to write samples before the audio system buffer underflows.
The timing of the loop is provided by the qtimer_sleep function. It sleeps until an absolute point in time so that any computation delays within the loop are accounted for. The basic timing paradigm is illustrated below:
                t_timeout timeout, interval;

                timeout_get_timeout(&interval, period); /* get the period as a t_timeout object */
                timeout_get_current_time(&timeout);     /* get the current time */

                while (!stop)
                {
                    ...

                    /* Wait until the next interval */
                    timeout_add(&timeout, &timeout, &interval);
                    qtimer_sleep(&timeout);
                }
The timeout functions get the current time (via timeout_get_current_time) and then compute the timestamp of the next point in time at which we wish to collect audio samples (via timeout_add). The qtimer_sleep function is called to wait until that absolute point in time.
Finally, the code snippet below prints out an error message for any error that may have occurred in the process of capturing audio samples:
                /* Print the appropriate message in case of errors. */
                if (result < 0)
                {
                    char message[1024];
                    msg_get_error_messageA(NULL, result, message, ARRAY_LENGTH(message));
                    printf("ERROR: Unable to capture audio samples. %s\n", message);
                }
You can now build your application. Before running the application, make sure that you have an audio render device connected (if one is not built in), such as a headset. After 10 seconds the application will exit on its own. Otherwise, press Ctrl+C to exit the application prematurely.
Capturing Video
The Multimedia API contains six functions for capturing video in a variety of formats. These functions are listed below:
video_capture_open
video_capture_set_property
video_capture_start
video_capture_read
video_capture_stop
video_capture_close
We use a C++ application to demonstrate how to use these functions to capture video from a camera.
Before going into the details of the source code for our example, remember to include the header files containing the functions used in your code. The header files included by the example are listed in the table below.
|
Header File |
Description |
|---|---|
|
|
Contains prototypes for error handling functions that are portable across all Quanser targets. For more information about this API, please refer to the Error Handling section. |
|
|
Contains prototypes for memory management functions that are portable across all Quanser targets. |
|
|
Contains prototypes for signal handling functions that are portable across all Quanser targets, and are used in the example for catching Ctrl+C. |
|
|
Contains prototypes for timer functions that are portable across all Quanser targets. Only the qtimer_sleep function is used by the example. |
|
|
Contains the prototypes for the video capture functions. |
The required header files are grouped into a common header file called stdafx.h in this example. The contents of this
header file are:
                #include "targetver.h"
                #include <stdio.h>
                #include "quanser_memory.h"
                #include "quanser_messages.h"
                #include "quanser_signal.h"
                #include "quanser_timer.h"
                #include "quanser_video.h"
The following description highlights only portions of the example code to better explain how the example works, rather than include all the code here. For example, the following code snippet establishes a signal handler that catches Ctrl+C so that the application can be terminated gracefully when pressing Ctrl+C rather than terminating it forcefully.
                static int stop = 0;

                void signal_handler(int signal)
                {
                    stop = 1;
                }

                int main(int argc, char * argv[])
                {
                    qsigaction_t action;

                    action.sa_handler = signal_handler;
                    action.sa_flags = 0;
                    qsigemptyset(&action.sa_mask);

                    qsigaction(SIGINT, &action, NULL);
                    ...
                }
Video capture requires a buffer for holding the sampled image. The image buffer must be large enough to hold the image in the requested format. The format used by MATLAB for RGB images is IMAGE_FORMAT_COL_MAJOR_PLANAR_RGB.
For example, for capturing a 640 x 480 RGB uint8 image in MATLAB format, a buffer such as:
t_uint8 image[640*480*3]; // Buffer for image frame
Since an image can be quite large, it should not really be allocated on the stack, so in our example, the image is dynamically allocated. The code snippet below is used to allocate the image buffer.
                /* Allocate an image buffer for a uint8 RGB image */

                image = (t_uint8 *) memory_allocate(frame_width * frame_height * 3 * sizeof(t_uint8));
                if (image != NULL)
                {
                    ...

                    memory_free(image);
                }
To open the video capture device, the following call is made:
                /* Open the video capture device */
                result = video_capture_open("video://localhost:0", frame_rate, frame_width, frame_height, IMAGE_FORMAT_COL_MAJOR_PLANAR_RGB, IMAGE_DATA_TYPE_UINT8, image, &capture, NULL, 0);
                if (result >= 0)
                {
                    ...

                    /* Close the video capture device */
                    video_capture_close(capture);
                }
The URL determines the video device being used. The "video:" scheme indicates that an actual video device is being used, as opposed to a web or file URL. The hostname of "localhost" indicates that the device is local to the current machine and the port of 0 indicates that the first available video capture device will be used.
The frame_rate is the frame rate in frames per second (Hz) at which the video samples will be captured, and is typically 30 Hz, although other frequencies may be used depending on the capabilities supported by the particular video capture device. The IMAGE_FORMAT_COL_MAJOR_PLANAR_RGB format is a column major image format where the red, green and blue pixels are in separate planes as opposed to interleaved. This format is used by MATLAB for RGB images. The IMAGE_DATA_TYPE_UINT8 data type indicates that each color component is a uint8 (byte).
The image buffer is passed to the video_capture_open function and will be used for storing frames when an image frame is read from the video capture device.
Finally, the address of a t_video_capture variable is passed, which will be initialized with the handle to the video capture session upon successful return from the function. The session should be closed when it is no longer needed using video_capture_close.
Video capture does not begin until the video_capture_start function is called. To stop video capture, use the video_capture_stop function. Video samples are read using the video_capture_read function. Hence, a typical loop for capturing video samples looks like:
                /* Start video capture */
                result = video_capture_start(capture);
                while (!stop)
                {
                    ...

                    /* Read one video frame into the image buffer set up in video_capture_open */
                    result = video_capture_read(capture);
                    if (result > 0)
                    {
                        ... process image buffer ...
                    }
                }

                /* Stop video capture*/
                video_capture_stop(capture);
The video_capture_read function returns 1 on success or a negative error code. If result is zero then no samples were available. The video_capture_read function is non-blocking so it must be called periodically to get frames before the internal video buffer overflows.
The timing of the loop is provided by the qtimer_sleep function. It sleeps until an absolute point in time so that any computation delays within the loop are accounted for. The basic timing paradigm is illustrated below:
                t_timeout timeout, interval;

                timeout_get_timeout(&interval, period); /* get the period as a t_timeout object */
                timeout_get_current_time(&timeout);     /* get the current time */

                while (!stop)
                {
                    /* Wait until the next interval */
                    timeout_add(&timeout, &timeout, &interval);
                    qtimer_sleep(&timeout);

                    ...
                }
The timeout functions get the current time (via timeout_get_current_time) and then compute the timestamp of the next point in time at which we wish to collect audio samples (via timeout_add). The qtimer_sleep function is called to wait until that absolute point in time.
On Windows, to display the video the video display functions are used. Using a video display is a two-step process. First, a window is opened and then a video stream is attached to the window. The basic paradigm is:
                t_video_window window;

                /* Open a video display window for displaying the captured video */
                result = video_display_open("Video Capture", NULL, &window);
                if (result >= 0)
                {
                    t_video_display display;

                    /* Attach a display object to the window for receiving the video stream */
                    result = video_display_attach(window, frame_rate, frame_width, frame_height, IMAGE_FORMAT_COL_MAJOR_PLANAR_RGB, IMAGE_DATA_TYPE_UINT8, true, &display);
                    if (result >= 0)
                    {
                        while (!stop)
                        {
                            ... capture video ...

                            /* Write the captured frame in "image" to the display */
                            video_display_write(display, image, frame_width * frame_height * 3);
                        }

                        /* Detach the video stream from the display */
                        video_display_detach(display);
                    }

                    /* Close the video display window */
                    video_display_close(window);
                }
The size of the image data must be passed to video_display_write because it can handle compressed images, whose size varies with each frame. The dimensions passed to video_display_attach are the maximum uncompressed dimensions of the image (the raw image format).
Finally, the code snippet below prints out an error message for any error that may have occurred in the process of capturing audio samples:
                /* Print the appropriate message in case of errors. */
                if (result < 0)
                {
                    char message[1024];
                    msg_get_error_messageA(NULL, result, message, ARRAY_LENGTH(message));
                    printf("ERROR: Unable to capture audio samples. %s\n", message);
                }
You can now build your application. Before running the application, make sure that you have a video capture device connected (if one is not built in), such as a webcam. After 10 seconds the application will exit on its own. Otherwise, press Ctrl+C to exit the application prematurely.
Capturing 3D Video
The Multimedia API contains numerous functions for capturing 3D video in a variety of formats. These functions are listed below:
video3d_open
video3d_open_file
video3d_stream_open
video3d_stream_set_properties
video3d_start_streaming
video3d_stream_get_frame
video3d_frame_get_number
video3d_frame_get_timestamp
video3d_frame_get_data
video3d_frame_get_motion_data
video3d_frame_get_meters
video3d_frame_release
video3d_stop_streaming
video3d_stream_close
video3d_close
We use a C++ application to demonstrate how to use these functions to capture 3D video from an RGBD camera.
Before going into the details of the source code for our example, remember to include the header files containing the functions used in your code. The header files included by the example are listed in the table below.
|
Header File |
Description |
|---|---|
|
|
Contains prototypes for error handling functions that are portable across all Quanser targets. For more information about this API, please refer to the Error Handling section. |
|
|
Contains prototypes for memory management functions that are portable across all Quanser targets. |
|
|
Contains prototypes for signal handling functions that are portable across all Quanser targets, and are used in the example for catching Ctrl+C. |
|
|
Contains prototypes for timer functions that are portable across all Quanser targets. Only the qtimer_sleep function is used by the example. |
|
|
Contains the prototypes for the 3D video capture functions. |
The required header files are grouped into a common header file called stdafx.h in this example. The contents of this
header file are:
                #include "targetver.h"
                #include <stdio.h>
                #include "quanser_memory.h"
                #include "quanser_messages.h"
                #include "quanser_signal.h"
                #include "quanser_timer.h"
                #include "quanser_video3d.h"
The following description highlights only portions of the example code to better explain how the example works, rather than include all the code here. For example, the following code snippet establishes a signal handler that catches Ctrl+C so that the application can be terminated gracefully when pressing Ctrl+C rather than terminating it forcefully.
                static int stop = 0;

                void signal_handler(int signal)
                {
                    stop = 1;
                }

                int main(int argc, char * argv[])
                {
                    qsigaction_t action;

                    action.sa_handler = signal_handler;
                    action.sa_flags = 0;
                    qsigemptyset(&action.sa_mask);

                    qsigaction(SIGINT, &action, NULL);
                    ...
                }
Video capture from an RGBD camera requires buffers for holding the sampled images. The image buffers must be large enough to hold the images in the requested format. The format used by MATLAB for RGB images is IMAGE_FORMAT_COL_MAJOR_PLANAR_RGB.
For example, for capturing a 640 x 480 RGB uint8 image in MATLAB format, a buffer such as:
t_uint8 image[640*480*3]; // Buffer for image frame
Since an image can be quite large, it should not really be allocated on the stack, so in our example, the image is dynamically allocated. The code snippet below is used to allocate such image buffer.
                /* Allocate an image buffer for a uint8 RGB image */

                image = (t_uint8 *) memory_allocate(frame_width * frame_height * 3 * sizeof(t_uint8));
                if (image != NULL)
                {
                    ...

                    memory_free(image);
                }
Now in this particular example, two types of images are retrieved from the camera: an RGB image and a depth image, so two image buffers are allocated. Since the depth image is a grayscale image with 16-bit resolution (uint16), its buffer is allocated as follows:
                /* Allocate an image buffer for a uint16 grayscale image */

                depth_image = (t_uint16 *) memory_allocate(frame_width * frame_height * sizeof(t_uint16));
                if (depth_image != NULL)
                {
                    ...

                    memory_free(depth_image);
                }
To open the 3D video capture device, the following call is made:
                /* Open the 3D video capture device */
                result = video3d_open("0", &capture);
                if (result >= 0)
                {
                    ...

                    /* Close the 3D video capture device */
                    video3d_close(capture);
                }
The first argument is the identifier for the camera. The "0" indicates that the first available RGBD camera should be used.
The final argument is the address of a t_video3d variable is passed, which will be initialized with the handle to the 3D video capture session upon successful return from the function. The session should be closed when it is no longer needed using video3d_close.
Unlike a normal camera, an RGBD camera typically supports multiple video streams, such as an RGB stream and a depth stream. It may also support multiple infrared streams and possibly gyroscope, accelerometer and pose streams. Hence, each stream that will be used has to be opened as well. For example, to open an RGB (colour) stream, code such as the following is used:
                t_video3d_stream rgb_stream;

                result = video3d_stream_open(capture, VIDEO3D_STREAM_COLOR, 0, frame_rate, frame_width, frame_height, IMAGE_FORMAT_COL_MAJOR_PLANAR_RGB, IMAGE_DATA_TYPE_UINT8, &rgb_stream);
                if (result >= 0)
                {
                    ...

                    video3d_stream_close(rgb_stream);
                }
The fact a color stream is being opened is indicated by VIDEO3D_STREAM_COLOR being passed as the second argument, which is from the t_video3d_stream_type enumeration. Other types of streams are listed in the table below:
|
Stream Type |
Description |
|---|---|
|
VIDEO3D_STREAM_DEPTH |
A depth stream, which consists of images containing the distance from the nearest object in view at each pixel to the camera. |
|
VIDEO3D_STREAM_COLOR |
A colour stream, which consists of regular RGB image from the camera. |
|
VIDEO3D_STREAM_INFRARED |
An infrared stream, which consists of grayscale images from infrared sensors used by the camera in determining depth. |
|
VIDEO3D_STREAM_FISHEYE |
A fisheye stream, which consists of grayscale images from fisheye sensors used by the camera (typically for tracking). |
|
VIDEO3D_STREAM_GYROSCOPE |
A gyroscope stream, which consists of three angular velocities (X, Y, Z) from the gyroscope sensor. |
|
VIDEO3D_STREAM_ACCELEROMETER |
An accelorometer stream, which consists of three cartesian accelerations (X, Y, Z) from the accelerometer sensor. |
|
VIDEO3D_STREAM_POSE |
A pose stream, which consists of 6-DOF coordinates expressing the position and orientation of the camera in the scene. This stream is typically generated by tracking cameras. |
The depth stream in the example is opened as follows:
                t_video3d_stream depth_stream;

                result = video3d_stream_open(capture, VIDEO3D_STREAM_DEPTH, 0, frame_rate, frame_width, frame_height, IMAGE_FORMAT_COL_MAJOR_GRAYSCALE, IMAGE_DATA_TYPE_UINT16, &depth_stream);
                if (result >= 0)
                {
                    ...

                    video3d_stream_close(depth_stream);
                }
The fact a depth stream is being opened is indicated by VIDEO3D_STREAM_DEPTH being passed as the second argument.
Video capture does not begin until the video3d_start_streaming function is called. To stop video capture, use the video3d_stop_streaming function. Video samples are read using the video3d_stream_get_frame function. Hence, a typical loop for capturing video samples looks like:
                /* Start video capture */
                result = video3d_start_streaming(capture);
                while (!stop)
                {
                    ...

                    /* Read one video frame from the given stream */
                    result = video3d_stream_get_frame(rgb_stream, &frame);
                    if (result >= 0)
                    {
                        result = video3d_frame_get_data(frame, image);
                        if (result >= 0)
                        {
                            ... process frame ...
                        }

                        video3d_frame_release(frame);
                    }
                }

                /* Stop video capture*/
                video3d_stop_streaming(capture);
The video3d_stream_get_frame function returns 0 on success or a negative error code. If result is -QERR_WOULD_BLOCK then no samples were available. This is not considered an error, but needs to be distinguished in the code from other negative error codes. The video3d_stream_get_frame function is non-blocking so it must be called periodically to get frames before the internal video buffer overflows.
Frames are containers for an image and other metadata about the image, such as the frame number and timestamp. Hence, to get the actual image, the video3d_frame_get_data must be called. If the stream is for motion data, such as gyroscope, accelerometer or pose data, then video3d_frame_get_motion_data must be called instead.
Frames must be released back to the video subsystem so that they may be re-used. Hence, as soon as the frame is no longer needed, it must be released using the video3d_frame_release function.
The timing of the loop is provided by the qtimer_sleep function. It sleeps until an absolute point in time so that any computation delays within the loop are accounted for. The basic timing paradigm is illustrated below:
                t_timeout timeout, interval;

                timeout_get_timeout(&interval, period); /* get the period as a t_timeout object */
                timeout_get_current_time(&timeout);     /* get the current time */

                while (!stop)
                {
                    /* Wait until the next interval */
                    timeout_add(&timeout, &timeout, &interval);
                    qtimer_sleep(&timeout);

                    ...
                }
The timeout functions get the current time (via timeout_get_current_time) and then compute the timestamp of the next point in time at which we wish to collect audio samples (via timeout_add). The qtimer_sleep function is called to wait until that absolute point in time.
On Windows, to display the video the video display functions are used. Using a video display is a two-step process. First, a window is opened and then a video stream is attached to the window. The basic paradigm is:
                t_video_window window;

                /* Open a video display window for displaying the captured video */
                result = video_display_open("Video Capture", NULL, &window);
                if (result >= 0)
                {
                    t_video_display display;

                    /* Attach a display object to the window for receiving the video stream */
                    result = video_display_attach(window, frame_rate, frame_width, frame_height, IMAGE_FORMAT_COL_MAJOR_PLANAR_RGB, IMAGE_DATA_TYPE_UINT8, true, &display);
                    if (result >= 0)
                    {
                        while (!stop)
                        {
                            ... capture video ...

                            /* Write the captured frame in "image" to the display */
                            video_display_write(display, image, frame_width * frame_height * 3);
                        }

                        /* Detach the video stream from the display */
                        video_display_detach(display);
                    }

                    /* Close the video display window */
                    video_display_close(window);
                }
The size of the image data must be passed to video_display_write because it can handle compressed images, whose size varies with each frame. The dimensions passed to video_display_attach are the maximum uncompressed dimensions of the image (the raw image format).
Finally, the code snippet below prints out an error message for any error that may have occurred in the process of capturing audio samples:
                /* Print the appropriate message in case of errors. */
                if (result < 0)
                {
                    char message[1024];
                    msg_get_error_messageA(NULL, result, message, ARRAY_LENGTH(message));
                    printf("ERROR: Unable to capture audio samples. %s\n", message);
                }
You can now build your application. Before running the application, make sure that you have a video capture device connected (if one is not built in), such as a webcam. After 10 seconds the application will exit on its own. Otherwise, press Ctrl+C to exit the application prematurely.
Copyright ©2026 Quanser Inc. This page was generated 2026-05-13. Submit feedback to Quanser about this page.
Link to this page.