
Creating Your First Visualization Part V - Transparency and Render Priority
Transparent objects require a few more considerations than completely opaque objects. The 3D viewer includes sorting algorithms to deal with most issues that you will encounter, but when one object overlaps another, then you need to provide the viewer some hints as to what is intended using the render priority. This will build on the model completed from Part IV. To start from that point, you can open the model here MATLAB Command Line Click to copy the following command line to the clipboard. Then paste it in the MATLAB Command Window: qc_open_library('quarc_visualization_example_part_iv_demo') . If you would like to just see the end result of this section, you can open the completed model here MATLAB Command Line Click to copy the following command line to the clipboard. Then paste it in the MATLAB Command Window: qc_open_library('quarc_visualization_example_part_v_demo') .
|
Note that Vista users will need to modify the default URI on the communications tab to |
Through the Looking Glass
When a scene is drawn, all the actors are first sorted by render priority (more on this shortly). Then, within a render priority group the actors are separated into opaque and transparent (or potentially transparent) actors. Opaque actors are rendered first from those nearest the camera to those furthest from the camera. Next, the transparent actors are rendered from those furthest from the camera to those nearest to the camera. The rendering process makes use of something called a depth buffer (of which the range is set by the near and far clipping planes). When a pixel is drawn on the screen, its depth into the screen is recorded by the depth buffer. If a new pixel is drawn at the same location in front of the existing pixel, it will be drawn. If it is behind the existing pixel, it will not be drawn. This is the reason for drawing opaque objects from front to back. If a near actor occludes another actor further away, then it saves processing time during the render routine because the occluded pixels of the actor that is further away will not need to be processed as extensively.
The downside of this approach is that the depth buffer has no concept of transparency. Even if a fully transparent pixel is drawn close to the camera, the depth buffer will prevent any pixels from being drawn behind it. It would be too computationally expensive to determine which pixel (or even triangle) of a mesh is in front of another, so instead the distance from the camera is calculated based on the origin of each mesh. If both actors are positioned at the same location, then you may see some flickering as the sorting algorithm is deciding which actor is in front because the distance varies slightly with each frame due to rounding errors.
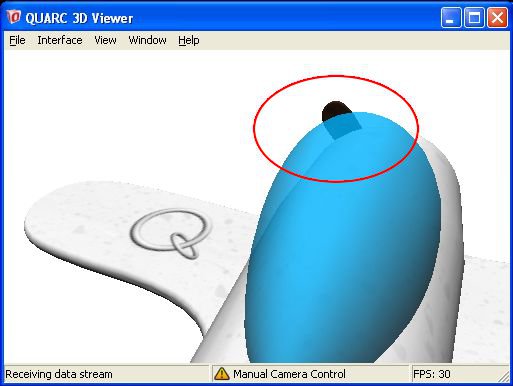
To see this problem in action, let's start by disabling the rotation of the airplane (set the ramp value to [0 0 0]) and let's slow down the propeller rotation to [1 0 0]. If we use the navigation keys to move in closer to the airplane and look through the canopy of the plane you may notice that you can see the airplane body through the canopy, but not the propeller. (This is sometimes dependent on your video card, so see the image below if this effect is not apparent on your monitor.)

Even though the propeller is completely opaque, it uses a png texture map and is therefore classified as potentially transparent and sorted as such (the bmp file format also has the same classification). Since the propeller and airplane share the same origin, there is some fighting over which actor should be rendered first. This can be fixed by setting the render priority of the propeller higher so that it is guaranteed to be rendered first relative to the airplane body. Edit the propeller actor and set the render priority to 5 (the actual number doesn't matter as long as it is higher than the body). Run your model again and now you should be able to see through the canopy.
If you recall, back in Part IV when we first setup the skybox, you may have seen some flickering with the skybox through the canopy. This was another case of fighting for which should be rendered first. If you set the skybox render priority to 10 before, then set it back to 0 now. If you run your model and adjust your view so you can again look through the canopy you will notice that the sky is no longer visible through the canopy.
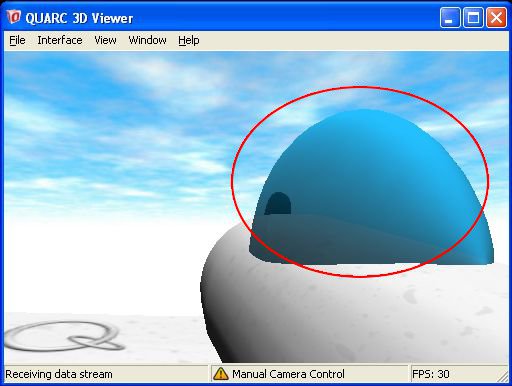
We first saw the flickering when the airplane and skybox were both located at the origin. There is no flickering now because the skybox is tied to the location of the camera, and therefore closer than the airplane. The skybox texture is also a png and therefore classified as potentially transparent so the skybox is rendered after the airplane (transparent objects are rendered from furthest to closest and based on the origins, the skybox is the closest), but the actual geometry of the skybox needs to be rendered before the airplane so we can look through the canopy to see the skybox. Set the skybox render priority back to a number greater than zero and you should now see that the sky is restored.

Advancing Further
This tutorial has covered a number of the major features available for the Quanser Visualization blocks, but there are many more features to explore. You can set material properties like specularity (shininess) and emissivity (self illumination) of which you can see examples in the Visualization Materials demo. When you are traveling through environments, you can use fog to create a better representation of depth and help fade distant objects into your background gracefully (see the Visualization Airplane demo). You can use the render priorities to create special effects like x-ray glasses (see the Visualization X-Ray demo). You can see some examples of how you can create basic shadows (see the Visualization Shadow demo). You can connect remotely to visualization models with multiple client viewers over your network or the internet (customer demonstrations, teleoperation, or making your own PVP game). Explore the visualization documentation and demos to discover further possibilities and unleash your creativity to bring your simulations and real-time data to life.
Copyright ©2026 Quanser Inc. This page was generated 2026-05-13. Submit feedback to Quanser about this page.
Link to this page.
