
Visualization Animate Dialog
When you are assembling actors to create a robot, for example, then you generally know the precise position that each joint should be located, thus it makes sense to use the Edit Actor dialog to set the initial position and orientation. However, for more randomly placed actors such as trees and vegetation or the camera angle, a more visual approach to actor placement can be helpful. This is the purpose of the Animate Scene dialog.
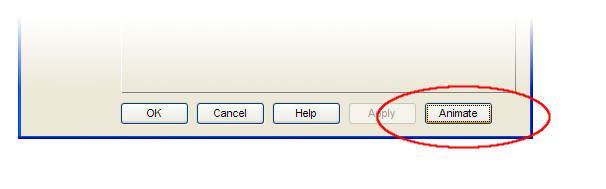
To open the Animate Scene dialog, click on the button in the lower right corner of the Visualization Initialize dialog as shown below:
Clicking this button will run the visualization and show your scene in the initial position, orientation, and scale dictated by the settings in the Edit Actors dialog. While your scene is loading, the Animate Scene dialog will also show up as shown below:
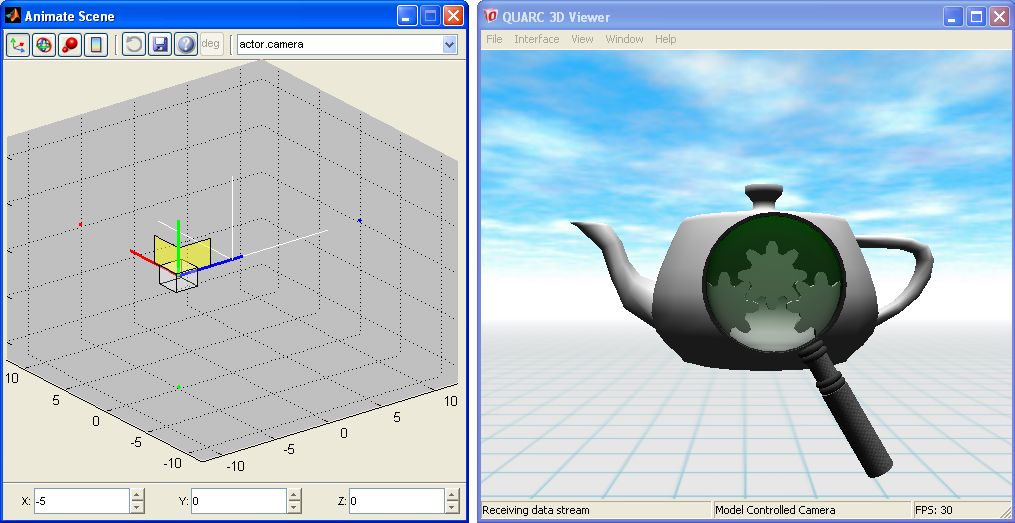
To modify a particular actor, select the desired actor from the popup menu in the upper right of the Animate Scene dialog. After that, you can use the following controls to modify the actor:

|
Drag the blue (x), red (y), or green (z) arms of the control widget to move the actor along just those axes, or grab the yellow planes to move in 2 axes at the same time. Scrolling your mouse wheel in the control window will zoom in and out if you need to move the actor beyond the default extents. The position can be numerically set using the three edit fields at the bottom. |
|

|
Click on the blue (x), red (y), or green (z) circles of the control widget and trace out the circle with your mouse to rotate the actor about those axes. Scrolling your mouse wheel in the control window will zoom in and out if you need to move the actor beyond the default extents. The position can be numerically set using the roll (x), pitch (y), and yaw (z) edit fields at the bottom. The default units are in degrees, but this can be changed to radians by clicking the button (clicking the button will return to degrees). |
|

|
Drag the blue (x), red (y), or green (z) arms of the control widget to scale the actor in those axes, or grab the yellow planes to scale in 2 axes at the same time. Scrolling your mouse wheel in the control window will zoom in and out if you need to scale the actor beyond the default extents. The scale can be numerically set using the three edit fields at the bottom. |
|

|
The color mode allows you to set a number of different parameters. Selecting from the popup menu in the upper left, you can change between the diffuse color and opacity (basic coloring and transparency), the specular color and shininess (the color of "reflected" light and size of the specular spots), and the emissivity (self illumination). In the diffuse mode, double clicking in the control window will bring up a color palette to select the diffuse color of the actor. Alternatively, you can drag the blue, red, or green arms of the control widget to change the corresponding color component of the actor color. Scrolling your mouse wheel in the control window will change the actor opacity. The colors and opacity can be numerically set using the four edit fields at the bottom. In the specular mode, double clicking in the control window will bring up a color palette to select the specular color of the actor. Alternatively, you can drag the blue, red, or green arms of the control widget to change the corresponding color component of the actor color. Scrolling your mouse wheel in the control window will change the actor shininess. Note that a small shininess such as 0.01 will result in a very large specular spot while a value close to 1.00 will be a very small spot. Specularity is view and light-position dependent, and it is also a function of the resolution of your mesh. Specularity generally does not work well on low resolution meshes. In the emissivity mode, the three main color components again affect the diffuse color, but the fourth component changes the emissivity. This will effectively wash out the diffuse and specular lighting until you reach a value of 1.0 at which point the actor will not be affected by diffuse or specular lighting. This can also be thought of as setting the ambient lighting on a per actor basis. A fully lit actor can be useful for user-interface elements which you do not want to be affected by scene lighting. |
|

|
Undo your previous action(s). When you close the control window, you will also be given the option to save your changes or not. (Note, the changes won't actually be saved to the scene file until you click on the Visualization Initialize dialog.) |
|

|
This will save your changes to the temporary scene file created for the Animate Scene dialog. The changes will not be saved to your actual scene file until you click on the Visualization Initialize dialog. |
|

|
Opens this help page. |
|

|
When in the rotation mode, this button will switch between degrees ("deg") and radians ("rad") for the edit fields at the bottom of the window. The text displayed on this button is the current units shown. |
After you have finished making your changes to your scene, you can close the Animate Scene dialog window. You will be prompted to save your changes if you have not done so already, and the viewer window will be automatically closed. If you have chosen to save your changes, the results will not actually be written to your scene file until you click and close the Visualization Initialize dialog window.
Copyright ©2026 Quanser Inc. This page was generated 2026-05-13. Submit feedback to Quanser about this page.
Link to this page.