
Shadows
Shadows are one of those things that you do not notice until they are missing. They are an important cue that we use to determine how close two objects are, relative sizes, and when contact is about to occur. The QUARC Visualization blocks do not yet support true shadow casting, but there are a couple tricks that you can use to create the appearance of shadows. As with all graphical approaches to real-time rendering, there are advantages and disadvantages to each approach and this page will help you understand those limitations so you can make an informed decision as to which approach is best for your application. The Visualization Shadow demo is the finished product of these concepts.
The Flattened Mesh
One of the simplest approaches to making a precise shadow of a mesh is to take the same mesh, flatten it, color it black and place it just above your ground surface. As the caster mesh rolls and pitches, you also want the shadow to roll and pitch, but still be flattened along the same axis. The way to achieve this is to first create a dummy actor with a scale of [1 1 0] (flatten along the z axis), then make your shadow mesh (the same mesh used for the caster) a child of the dummy.
Translations applied to the caster are applied to the dummy with the exception of the z component which is set to a constant just above the ground plane. Rotations applied to the caster are applied to the shadow (not the dummy). This way the scale factor is always applied along the z axis (since we don't rotate the dummy), but the shadow still takes on the apparent orientation of the caster. The shadow demo includes a few more blocks in order to scale the size of the shadow as the altitude changes and shift its position relative to the caster as a function of the caster's altitude.
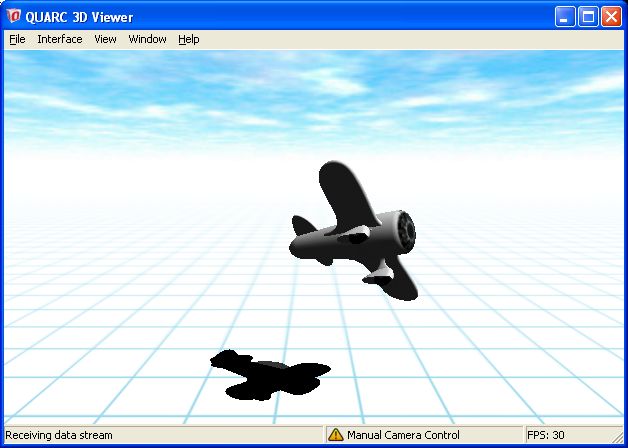
This approach creates a shadow that handles any orientation of the caster, so why would we not always use this approach? It does require a second copy of the caster mesh which could be costly depending on the complexity of the mesh. The other problem is that the shadow is completely black and the surface underneath does not show through. Setting the alpha component of the shadow to 0.5 for example would allow some of the texture below through, but the three dimensional nature of the shadow can betray itself in certain orientations (this is highly dependent on the geometry of the mesh).
If you use a color for the mesh other than [0 0 0], then the mesh will be subject to lighting calculations unless (as done in the demo) a copy of the mesh is made with the normals removed from the x3d file (this can be done with a text editor by just deleting the normals line). By deleting the normals, the mesh will be fully lit and subject only to the color set in the actor parameters and its texture map. The demo takes this one step further by using a texture map for the shadow where the canopy of the airplane is slightly transparent so the shadow is lighter there as expected. Whether or not this works for your application is highly dependent on the mesh geometry.
The Bitmap Shadow
If your caster mesh only has rotation about the z axis, then rather than using a flattened mesh, you could use a bitmap of a shadow instead. If rotations about x and y are relatively small, then you can even potentially use this technique by applying small about of scaling to the rectangle on which the shadow is mapped to create the appearance of a change of perspective on the shadow without actually changing the texture map.
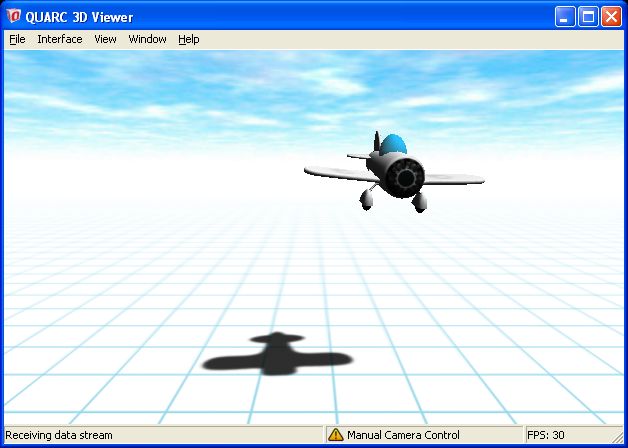
Aside from the obvious motion limitations, this approach does have a number of advantages. For one, you can now make the shadow transparent without the artifacts that would occur with flattening a true 3D mesh. This way surfaces below will show through. Another benefit is that you can have "soft" shadows where the edges are blurry by feathering the edges of your shadow bitmap with the alpha component. An extension of this idea is casting colored light from a semi-transparent object such as a stained glass window.
If you require more substantial rotations from your caster mesh, but do not want to give up the advantages of bitmapped shadows, then you could create a very blurry shadow that just provides enough of a presence to show when an actor contacts a surfaces, but not enough to show detail that would give away its lack of rotation. Alternatively you could use a series of layered shadows that you could scale and fade in and out for different orientations.
Texture Baking
If there are some objects in your scene that do not move or rotate relative to the light sources, then you can take advantage of texture baking. The general idea is that rather than calculating all the shading in real-time, you compose your scene of static objects in a tool such as 3ds Max with all the lighting that you want. Once you are happy with your scene you "render to texture" (as opposed to rendering from the perspective of the camera) for each object in your scene. This creates a series of bitmaps for each object that you had in your scene with the original textures, but now they also include all the lighting and shadows that would have been cast from the various light sources. This technique is called texture baking.
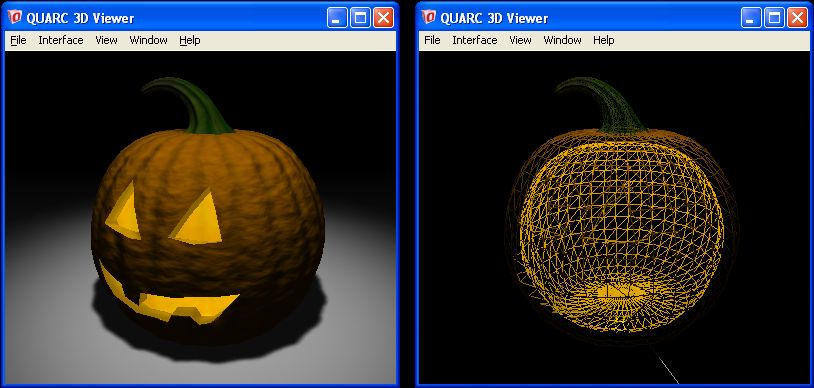
The Visualization Texture Baking demo uses this approach to create very complex shadows There is a spot light above the pumpkin, and you can see the shadow cast from the stem extending down the surface of the pumpkin skin. The skin itself uses a process called normal mapping in 3ds Max to give it the rough surface appearance. This creates small variations in the lighting giving the surface the appearance of more detail than actually exists in the geometry. You can see this in the image below. The wireframe view to the right has substantially less detail that what appears on the surface of the pumpkin.
If you examine the texture baking demo in detail, you might notice that there are no lights in the scene. This is because all the meshes (with the exception of the inside of the pumpkin) are fully lit all the time by setting their emissive properties to 1. We do not want these meshes to be affected by light sources in the real-time scene because their lighting has already been calculated. The exception is the inner surface of the pumpkin on which noise is applied to the emissivity to emulate the flicking light source of a candle.
Although this method of creating shadows can create some spectacular results, in general, the meshes and light sources cannot be moved otherwise the illusion will be destroyed. The other difficulty is integrating moving actors into a scene that includes texture baking. Assuming all the light sources are fixed, you will want to place the light sources in your scene in the same locations that they were found in your modeling tool so the apparent shading on your moving actors matches the rest of your scene. This would also likely be a good candidate for the use of shadow bitmaps rather than flattening a mesh as shadow bitmaps will likely blend more easily into a pre-rendered environment.
Copyright ©2026 Quanser Inc. This page was generated 2026-05-13. Submit feedback to Quanser about this page.
Link to this page.