
Altia Initialize
Initializes the interface to an Altia GUI and associates a name with the interface.
Library
QUARC Targets/User Interface/Altia MATLAB Command Line Click to copy the following command line to the clipboard. Then paste it in the MATLAB Command Window: qc_open_library('quarc_library/User Interface/Altia')
Description

The Altia Initialize block associates a name with a particular Altia interface. This name will appear in the list of interfaces for every other Altia block. It is the interface name that associates the other Altia blocks with a particular Altia interface. Using a separate block to configure the Altia interface makes it trivial to change the Altia GUI being used and makes it easier to route signals to and from the Altia GUI.
The Altia Initialize block creates a set of threads that manage the interface to the Altia GUI. The interface to the Altia GUI is not initiated until the first time this block executes. Hence, the Sample Time parameter can be used to affect when the interface is first initiated. Communications with the Altia GUI are persistent - if the GUI is closed and reopened, the connection will be re-established automatically. Hence, it doesn't matter what order the real-time code and Altia GUI are run. The model will connect to the Altia GUI whenever it is open and listening on the specified port.
Installation Requirements
 In order to use the Altia Initialize block, the
Altia software must be installed. The Altia software must be purchased separately.
Also, before using the Altia Initialize block for
the first time, an environment variable called
In order to use the Altia Initialize block, the
Altia software must be installed. The Altia software must be purchased separately.
Also, before using the Altia Initialize block for
the first time, an environment variable called ALTIAHOME must be created
that points to the installation directory for Altia. For example, C:\usr\altia803ds.
To create an environment variable, open the System properties from Control Panel,
choose the Advanced tab, and then click on the Environment Variables button. In
the Environment Variables dialog, click on the New button under the System variables
section and enter ALTIAHOME as the variable name and the installation
directory for Altia as the variable value. It will be necessary to restart MATLAB
after setting the environment variable because applications make a local
copy of environment variables at startup.
Input Ports
This block has no input ports.
Output Ports
This block has no output ports.
Parameters and Dialog Box
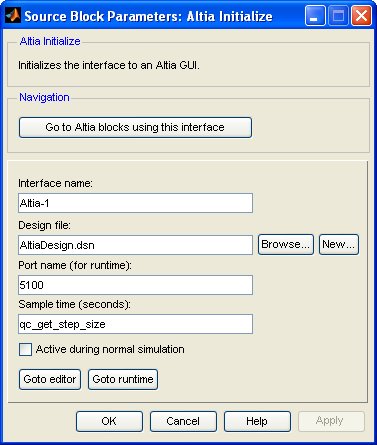
Go to Altia blocks using this interface
Opens a dialog that lists all the Altia blocks in the model which are currently using the interface defined by this Altia Initialize block. The dialog may be used to go to another Altia block in the model just by double-clicking on the name of the block in the dialog box.
Interface name
The name to assign to the interface. This name will show up in the list of interfaces for the other Altia blocks. It is this name that associates the other Altia blocks with the interface selected by this block.
Design file (tunable offline)
Altia design file containing the design of the Altia GUI. Design files have a
.dsn extension and are created using the Altia Editor. The block stores
the path of the design file relative to the model to make it easier to move the
model to a new location.
To create a new design, click on the button. An empty design file will be created with the name specified and the Altia Editor opened for this design file. To choose an existing design, click on the button or enter the path to the design file directly. The relative path to the design file will appear in the edit field.
Port name
The TCP/IP port to use for communications with the Altia GUI. The port name is only used for communicating with the Altia Runtime. The Altia Editor uses port 5100. For communicating between real-time code and an Altia GUI on another machine, enter the port name in the form:
hostname:port
where hostname is the hostname or IP address of the machine running the
Altia GUI and port is the TCP/IP port upon which the Altia GUI is listening.
It is important to note that the Altia GUI acts as the server and the real-time
code acts as a client. Quanser would prefer that the real-time code was the server
and the Altia GUI a client, but that is not the way Altia has designed their software.
Sample time
The sample time of the block. A sample time of 0 indicates that the block will be treated as a continuous time block. A positive sample time indicates that the block is a discrete time block with the given sample time.
A sample time of -1 indicates that the block inherits its sample time. Since this is a source block, only inherent the sample time when it is placed in a conditionally executed subsystem, like a Triggered or Enabled Subsystem, or in a referenced model.
The default sample time is set to qc_get_step_size, which is a QUARC function that returns the fundamental sampling time of the model. Hence, the default sample time is a discrete sample time with the same sampling time as the fixed step size of the model.
Active during normal simulation (tunable offline)
Indicates whether this block should access the Altia GUI during normal simulation. If the Altia Initialize block is deactivated by unchecking this option then all Altia blocks configured to use this particular interface will also be deactivated.
Goto editor
Opens the specified design file in the Altia Editor. The port used by the editor will be port 5100 regardless of the value of the Port name parameter to avoid conflicts with the Altia Runtime when it is opened for the design. To interface with the Altia Editor itself, put the editor in Run mode and set the Port name parameter to 5100.
Goto runtime
Opens the specified design file using the Altia Runtime. The port used by the runtime will the port specified in the Port name parameter. This button executes the Altia Runtime using the command:
altiart -lan -port "<port_name>" -file "<design_file>"
where <port_name> is the value of the Port name
parameter and <design_file> is the full
path to the design file specified in the Design file
parameter. You can run this command manually or through a shortcut to run the Altia GUI.
Targets
|
Target Name |
Compatible* |
Model Referencing |
Comments |
|---|---|---|---|
|
Yes |
Yes |
||
|
Yes |
Yes |
||
|
Yes |
Yes |
||
|
Yes |
Yes |
||
|
Yes |
Yes |
||
|
Yes |
Yes |
||
|
Yes |
Yes |
||
|
Yes |
Yes |
||
|
Yes |
Yes |
||
|
Yes |
Yes |
||
|
Yes |
Yes |
||
|
Yes |
Yes |
||
|
Yes |
Yes |
||
|
Yes |
Yes |
Last fully supported in QUARC 2018. |
|
|
Rapid Simulation (RSIM) Target |
Yes |
Yes |
|
|
S-Function Target |
No |
N/A |
Old technology. Use model referencing instead. |
|
Normal simulation |
Yes |
Yes |
See Also
Copyright ©2026 Quanser Inc. This page was generated 2026-05-13. Submit feedback to Quanser about this page.
Link to this page.