
Channel Selection Dialog
The Channel Selection Dialog is a generic dialog for selecting a list of channels from a set of available channels. This dialog is typically opened by clicking on the "browse" button, labelled "...", next to a list of channels, as illustrated below:

This action opens the Channel Selection dialog depicted below. In this example, the Channel Selection dialog is being used to select a set of digital input channels from all available digital inputs. The list on the left, labelled "Channels available", shows the channels from which you may choose. The list on the right, entitled "Channels selected", shows the channels that have been selected. Once a channel has been selected, it is no longer shown in the list of available channels because channels may not be selected more than once. Channels are selected using the >> (Add) or Select All buttons. Channels are removed from the selection using the << (Remove) or Clear All buttons. These buttons are described in detail in the sections that follow.
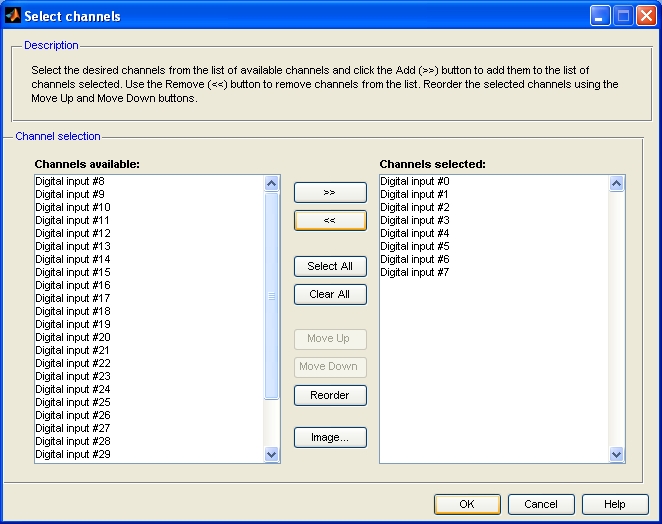
The order of the channels in the list of selected channels is significant. It determines the order in which the signals that are read (or written) are output from (or input to) the Simulink block. Because the order is significant, the Channel Selection dialog provides the Move Up, Move Down and Reorder buttons to reorder the channels in the list of selected channels. The following sections describe these buttons in detail, as well as the other buttons in the dialog.
Buttons
>> (Add)
To add a set of channels to the list of selected channels, choose the channels in the list of available channels. To choose a range of channels, click on the first channel in the range and then hold down the Shift key and click on the last channel in the range. To add or remove individual channels from those chosen, hold down the Ctrl key while clicking on the channel. The keyboard may also be used to choose channels by using the up and down arrow keys to navigate and the Space bar to add or remove a channel from those chosen. Once a set of channels has been chosen in the list of available channels on the left, click on the button to transfer those channels to the list of selected channels on the right.
<< (Remove)
To remove a set of channels from the list of selected channels, choose the channels in the list. To choose a range of channels, click on the first channel in the range and then hold down the Shift key and click on the last channel in the range. To add or remove individual channels from those chosen, hold down the Ctrl key while clicking on the channel. The keyboard may also be used to choose channels by using the up and down arrow keys to navigate and the Space bar to add or remove a channel from those chosen. Once a set of channels has been chosen in the list of selected channels on the right, click on the button to transfer those channels back to the list of available channels on the left.
Select All
To add all available channels to the list of selected channels, click on the button. All the channels in the list of available channels on the left will be transferred to the list of selected channels on the right.
Clear All
To remove all the channels from the list of selected channels, click on the button. All the channels in the list of selected channels on the right will be transferred back to the list of available channels on the left.
Move Up
To move a set of channels upward in the list of selected channels, first choose the channels to be moved. To choose a range of channels, click on the first channel in the range and then hold down the Shift key and click on the last channel in the range. To add or remove individual channels from those chosen, hold down the Ctrl key while clicking on the channel. The keyboard may also be used to choose channels by using the up and down arrow keys to navigate and the Space bar to add or remove a channel from those chosen. Once a set of channels has been chosen, click on the button to move those channels toward the top of the list.
Move Down
To move a set of channels downward in the list of selected channels, first choose the channels to be moved. To choose a range of channels, click on the first channel in the range and then hold down the Shift key and click on the last channel in the range. To add or remove individual channels from those chosen, hold down the Ctrl key while clicking on the channel. The keyboard may also be used to choose channels by using the up and down arrow keys to navigate and the Space bar to add or remove a channel from those chosen. Once a set of channels has been chosen, click on the button to move those channels toward the bottom of the list.
Reorder
It is often convenient to have the list of selected channels appear in the same order as they originally appeared in the list of available channels (typically numerically ascending order). However, when channels are selected and unselected repeatedly, this "natural" ordering can become disrupted. To reorder the list of selected channels according to their "natural" ordering, click on the button.
Image...
When connecting an apparatus to a data acquisition card or terminal board, it can sometimes be confusing to associate pins on a connector with the corresponding channels in software. If the button is enabled, channels may be selected directly from a picture of the connector or terminal board for the data acquisition card. This functionality may also be used to quickly identify the pins associated with the set of channels currently selected. Clicking on the button causes the Channel Selection from Image Dialog to open. For more details on this dialog, follow the preceding hyperlink.
See Also
Copyright ©2026 Quanser Inc. This page was generated 2026-05-13. Submit feedback to Quanser about this page.
Link to this page.