
Channel Selection from Image Dialog
The Channel Selection from Image Dialog is a generic dialog for selecting a list of channels directly from a picture of the data acquisition card's external connector or terminal board. This dialog is typically opened by clicking on the Image... button of the Channel Selection Dialog. The Channel Selection from Image Dialog is depicted below for the Q8-series terminal board. Analog input channels are being selected. Channels 0-2 have already been selected and are highlighted in red. Channel 3 is not selected but lies under the mouse so it is highlighted in green.
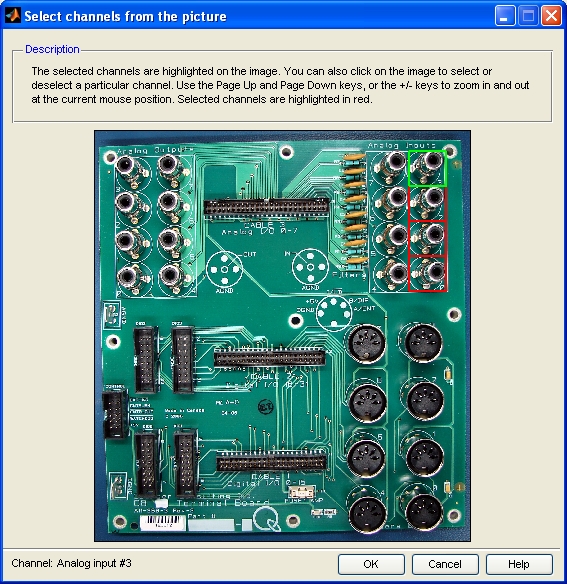
To select a channel, simply move the mouse over the desired channel until it is highlighted in green. Then click with the left mouse button to select that channel. The channel will become highlighted in red, indicating that it is selected. Note that the highlighting turns yellow if the mouse is moved over a selected channel.
To unselect a channel, simply move the mouse over the desired channel until it is highlighted in yellow. Then click with the left mouse button to unselect that channel. The channel will now have no highlighting at all. Note that unselected channels are highlighted in green when the mouse is moved over that channel.
Sometimes it is necessary to magnify the image to be able to see the different channels. For example, the pins in a digital I/O header are often quite small. Fortunately, the Page Down and Page Up keys may be used to zoom in and out respectively. Zooming in and out is always performed in a way that leaves the current mouse position in the center of the image (unless the bounds of the image would be exceeded). Hence, to zoom in to a particular area of the image, simply hold the mouse over the desired area and press Page Down. The scroll wheel on the mouse may also be used to zoom in and out, as can the + and - keys.
See Also
Copyright ©2026 Quanser Inc. This page was generated 2026-05-13. Submit feedback to Quanser about this page.
Link to this page.