
Using the Floating Scope
The Floating Scope is a sink block from the Simulink/Sinks library in the Simulink Library Browser. This block is similar to the Scope block, but it does not have any input ports! Instead, you can select any signals in your model and view them on the Floating Scope. You can even change the signals being plotted while the model is running! Unlike some other real-time targets, QUARC fully supports the Floating Scope block in both normal simulation and external mode. The Floating Scope can be very convenient for testing the signals in a model because there is no need to preconnect a Scope to the signals of interest.
There are two methods of viewing signals in the Floating Scope - via the model window itself or through the signal selector dialog.
Using the Model Window
The simplest method of selecting signals to be viewed on the Floating Scope is to use the model window itself. Consider the sample Simulink model shown below.
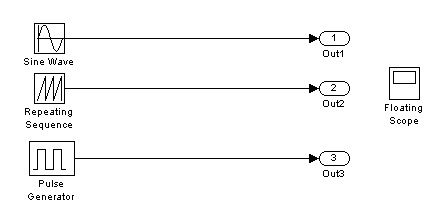
Three different classes of signals are used in the example: a sine wave, a sawtooth and a pulse. Using different signals makes it readily apparent which signal is being plotted. The signals are connected to Outport blocks simply to have a place to connect them. There is no significance to the Outport blocks in relation to the Floating Scope.
Important Note: If the Signal storage reuse option is enabled in the Optimization pane of the Configuration Parameters dialog then not all the signals in a diagram may be plotted, because some of them will reuse the same memory locations. To ensure that all signals in a model may be plotted on a Floating Scope, first disable the Signal storage reuse option. For more information on this option and the Optimization pane in general, please refer to the Optimization Pane MATLAB Command Line Click to copy the following command line to the clipboard. Then paste it in the MATLAB Command Window: qc_open_matlab_help('config_optimization') section of the Simulink documentation.
To open the Floating Scope window, double-click on the block as you would with a Scope. Once the window is open and the model is running, click on the plotting area within the window. A blue border appears around the plotting area, as shown below, which indicates that signals may now be selected.
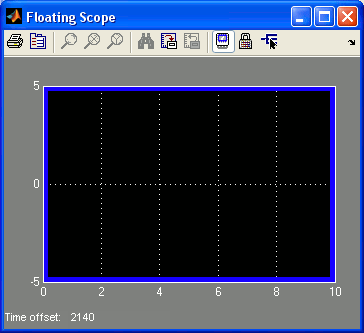
If the blue border does not appear around the axis, you cannot select signals for it. Once the blue border appears, go to the model window and click on one of the lines connecting the blocks. These lines represent signals in the model and may be plotted in a Floating Scope. In order to view multiple signals on an axis, hold down the Shift key and select as many signals as desired. All the selected signals will be plotted in the Floating Scope. To remove a signal from the plot, hold down the 'Shift key and click on the signal in the model window to remove it. It is that easy!
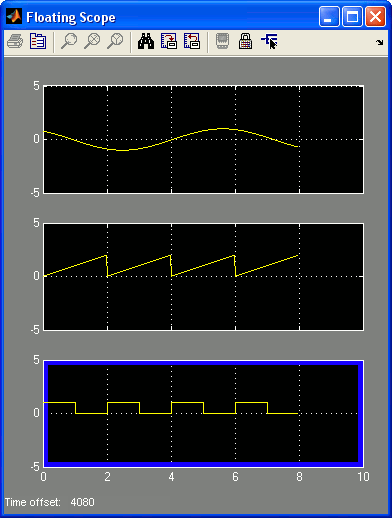
You may also put multiple axes on a Floating Scope by setting the Number of axes parameter in the Floating Scope Parameters dialog to any number greater than 1. For the purpose of this example, set this number to 3 to have three axes on the Floating Scope. You can now click on any one of the three axes to activate the blue border and then choose signals from the model window to be viewed on that axis. For this example, use this technique to select the sine wave for the first axis, the sawtooth wave for second axis and the pulse for the third axis. Don't forget that the blue border must be present on an axis to select signals for that axis. Your Floating Scope window should now look similar to the following figure.
Using the Signal Selector Dialog
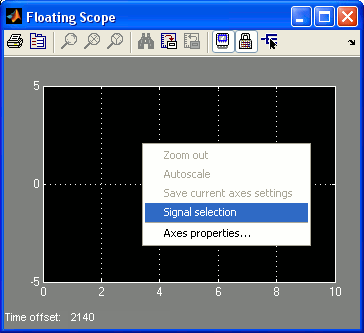
Another method of selecting the signals to be viewed on the Floating Scope is to use the Signal Selection dialog. To open this dialog, right-click on an axis in the plotting area and choose the item from the pop-up menu as shown below.
The Signal Selector dialog opens as shown in the following figure.
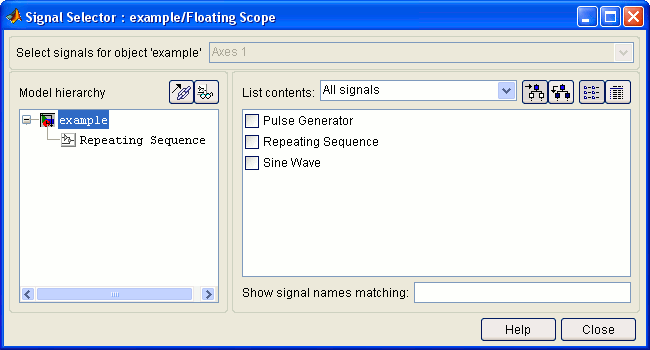
Select the signals to be viewed on the Floating Scope by clicking on the checkbox beside each signal to be viewed. Since the Floating Scope allows multiple signals to be viewed on one axis, you can select multiple signals. Notice how the selected signals become highlighted in blue. This highlighting indicates that the signal will be viewed on the Floating Scope.
Select the signals to be viewed on the Floating Scope by clicking on the checkbox beside each signal to be viewed. Since the Floating Scope allows multiple signals to be viewed on one axis, you can select multiple signals. Notice how the selected signals become highlighted in blue. This highlighting indicates that the signal will be viewed on the Floating Scope.
If the Floating Scope is configured to have multiple axes, as discussed in the preceding section, you can right-click on each axis or use the Select signals for object 'example' list to select signals for each axis. Choosing the sine wave, sawtooth wave and the pulse wave for "Axes 1", "Axes 2" and "Axes 3" respectively will produce the Floating Scope window illustrated in the previous section.
For more information on the Floating Scope, refer to the Scope, Floating Scope, Signal Viewer Scope MATLAB Command Line Click to copy the following command line to the clipboard. Then paste it in the MATLAB Command Window: doc('Floating Scope') reference page in the Simulink documentation.
Copyright ©2026 Quanser Inc. This page was generated 2026-05-13. Submit feedback to Quanser about this page.
Link to this page.