
Establishing Remote Connections
One of the powerful features of the Visualization blocks in QUARC is the ability to run your model on one machine, and connect a visualization to it from single or multiple remote machines each running their own copy of the 3D Viewer. To create a connection to a remote target is very similar to connecting to a visualization server running on the same machine, but there are a couple more considerations.
| On the QUARC CD in the win32/viewer folder are setup files for just the viewer. Running this setup.exe is all that is required on a remote machine. The client machine does not require Visual Studio or Matlab for just the viewer to work. |
Setting Up TCP/IP
The first change that needs to be made is to modify the
Visualization Initialize
block from the default URI using shared memory (shmem://) to TCP/IP (tcpip://).
You can use the "..." button next to the URI on the Communications tab of the
Visualization Initialize block to bring up the URI selection dialog.
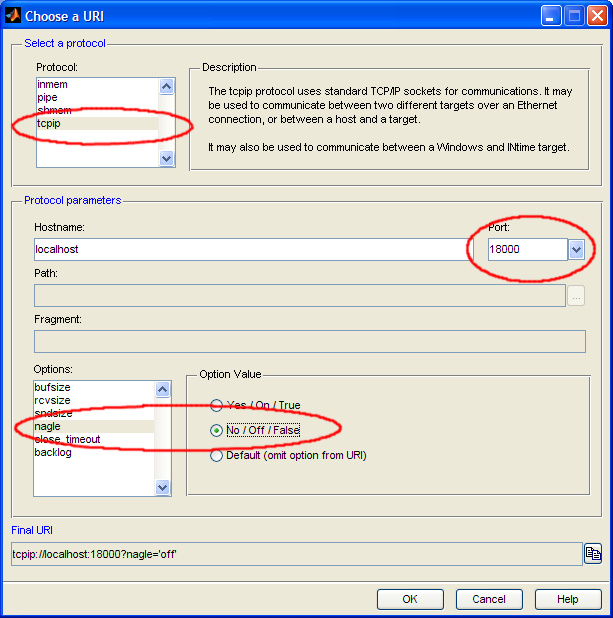
Use a port that is different from your model communications port (it is suggested that you use 18000), and it is highly recommended that you set the nagle option to 'off' or 'no'. When the nagle algorithm is enabled, the TCP/IP stack attempts to optimize the use of bandwidth by collecting together multiple packets. However, for the visualization, this gives the appearance of a lower frame rate since multiple data frames arrive all at once and only the last one is used. With the nagle disabled, the packet will be sent right away and the animation should appear smoother.
After you click the button, your URI should appear as shown below:
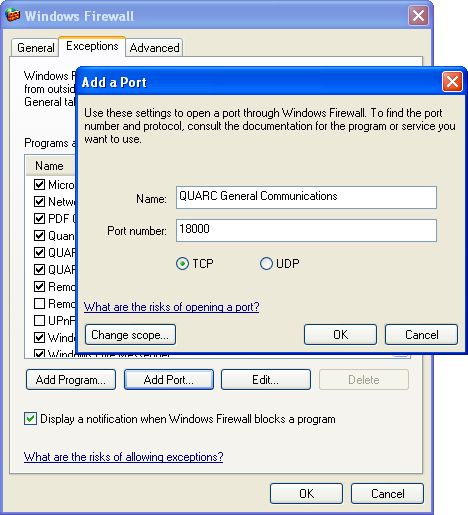
Depending on your computer firewall settings, it may be necessary to open port 18000. Assuming you are using the Windows firewall, on Windows XP you can open a port by going to the Control Panel, Security Center, and click on the Windows Firewall under the Manage Security Settings section. From the Windows Firewall dialog, go to the Exceptions tab and click on the , give the port exception a name and enter port 18000 (or whatever port you selected for your visualization communications) and TCP. Click to close the dialog.
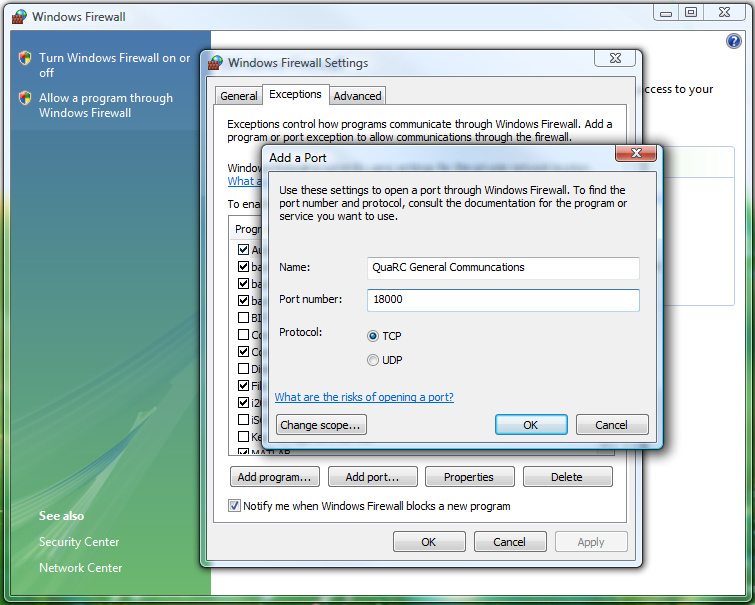
On Windows Vista, go to the Control Panel, Windows Firewall, and Change Settings. On the Windows Firewall Settings dialog, go to the Exceptions tab and click on the , give the port exception a name and enter port 18000 (or whatever port you selected for your visualization communications) and TCP. Click to close the dialog.
If you are using a third party firewall, then you will need to refer to the appropriate documentation to determine how to open ports on your computer.
Determining Your Server IP Address or Name
Connecting Through a Local Area Network
Connecting through a local area network (LAN) is relatively straight forward. Although the server will
now be running on the "localhost", we either need to determine the machine's IP address, or the computer
name. For the IP address, go to your Windows
Start menu, go to Run, type cmd. From the command prompt, type ipconfig and hit enter.
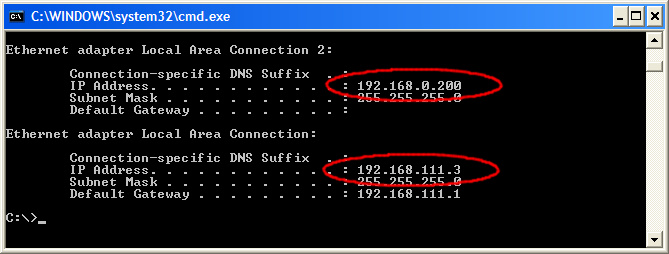
On a basic setup, you will only have one IP address, but if you have WiFi, or virtual adapters,
As shown below, you may have multiple Ethernet or Wireless LAN adapters, each with their own IP address
in which case you will need to determine which connection you are using. The procedure on Vista is
the same except it may show multiple address for a single adapter in which case you will want the
IPv4 Address.
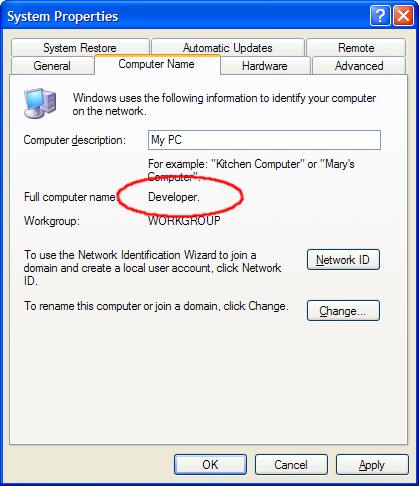
If you would rather use your computer name instead of your IP address, go into your Control Panel, System Properties, and go to the Computer Name tab (there is no tab in Vista). The name we need is the "Full Computer Name". In this case, the computer name is "Developer".
Connecting Through a Wide Area Network or the Internet
Connecting through the internet is a bit more involved and may require the assistance of your network administrators. If you are behind a router, then chances are that the IP address that you get using ipconfig from a command prompt is not your external IP address. You can do a web search of "what is my ip" to find out your external IP address.
If the IP address returned by the external website is different that the IP address that you get running ipconfig at the command prompt, then you will either need to make some modifications to your router, or talk to your network administrator. If you can modify your router, you will need to setup port forwarding to pass port 18000 (or whatever port you selected) to the IP address of your computer and provide the external IP address to the users of the 3D Viewer. If a network administrator runs your network, they may be able to provide you with an external static IP address that is mapped to your local machine.
Connecting From a Remote Machine
We now have all the information we need to connect from a remote machine. You are responsible for sending the remote machine the scene file and all the associated meshes and textures (the Simulink model file is not used).
| If you reference all your meshes and textures using relative paths instead of absolute then it is easier to send a visualization to a remote machine. |
Note that the server side does not actually require the mesh or scene files to run, but the scene file is required during building to calculate the appropriate memory offsets into the communications packet. For this reason, if the order of the actors is modified in the scene file, even if the content remains the same, then the client viewer will require an updated version of the scene file in order to properly communicate with the server.
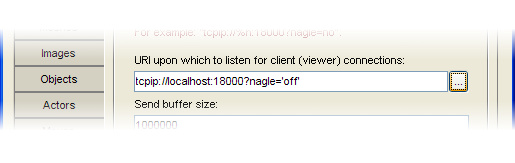
Once your client side has all the appropriate files, you can open the 3D Viewer from the Start Menu (for command line options, see the 3D Viewer help page). Open your scene file from the menu. After the scene file is open, go to the menu and . On the Enter URI dialog you can enter the appropriate URI. From the example above, that would be:
tcpip://192.168.111.3:18000?nagle=off
or
tcpip://developer:18000?nagle=off
Set the buffer sizes to match the server (refer to the help pages on the 3D Viewer and the Visualization Initialize block to help understand the considerations for using buffer sizes different from the server side), and finally click connect. If the server (your model) is not yet running, then the 3D Viewer will continuously try to connect until you either connect to a different URI, disconnect, or close the application. Once the visualization server is running, the client should quickly connect, exchange information on what actor parameters are to be modified in the visualization, then begin streaming data. The Visualization Initialize block supports multiple client connections, but depending on the amount of data that is transmitted and the speed of your connection, a large number of clients can potentially reduce the apparent frame rate of the animation.
Copyright ©2026 Quanser Inc. This page was generated 2026-05-13. Submit feedback to Quanser about this page.
Link to this page.

