
Visualization Set Variables
Sets parameters of the actors created with the Visualization Initialize block.
Library
QUARC Targets/User Interface/Visualization MATLAB Command Line Click to copy the following command line to the clipboard. Then paste it in the MATLAB Command Window: qc_open_library('quarc_library/User Interface/Visualization')
Description
When a visualization is created, all of the actors will be initialized based on the initial properties set in the Visualization Initialize block. If you want to modify the actor's position, orientation, scale, transformation matrix (changing position, orientation, and scale all at the same time), color, opacity, specularity, or emissivity in response to simulation events, then you will use the Visualization Set Variables block. Assuming the camera is in the default orientation, then the visualization follows the Quanser Standard Axes with the positive x direction going into the screen, the positive z direction up, and the positive y direction left.
Input Ports
The number and type of input ports is dependent on the selections made in the Visualization Set Variables dialog.
Each port will on the block can independently convert the input sample rate to the sample rate
of the block so rate transition blocks are not required. However, this does mean that
at least one block in the signal path prior to the Set Variable block must
have a specified sample time that is not inherited. You can use the visualization_get_frame_period
to get the frame rate from the Visualization Initialize block
or qc_get_step_size to get the current step size of you model which you can use for the
block sample time.
Output Ports
This block has no output ports.
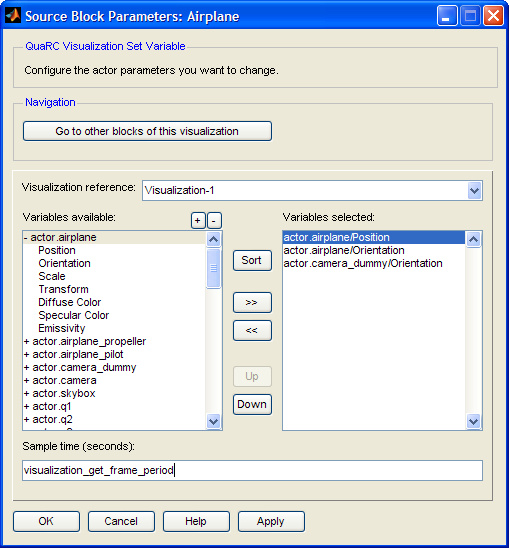
Parameters and Dialog Box
Common Buttons
The dialog box for the Visualization Set Variables block contains the usual , , and buttons for agreeing to the changes and closing the dialog, canceling the changes, applying the current changes, and getting help respectively. Note, if the Visualization Set Variables dialog is open, it have to be closed before changes to the Visualization Initialize can be made.
Navigation
Clicking on the "" button will bring up another dialog that lists all the blocks associated with the current visualization reference.
Visualization Reference
This selects the reference name indicated on the main tab of the Visualization Initialize block. If more than one Visualization Initialize block is in the diagram, then all references will be listed in the drop down box so you can select to which scene this Visualization Set Variables block refers.
Variables available and selected
The Variables available list indicates all actors that are currently in the scene file. By double clicking on an individual actor, you can expand the current selection to show the available variables. Clicking the "+" or "-" buttons above the Variables available list will expand or collapse the entire list. The actors are listed in the same order they are found in the Visualization Initialize block. Clicking the button will sort the list alphabetically.
After selecting one or more actor variables (use CTRL-click to select individual items, or Shift-click to span several items), clicking the ">>" button will move the selected items to the Variables selected list. Selecting items from the Variables Selected list and clicking the "<<" button will remove the selected items. After clicking or , these variables will now become available as input ports to the block in the order they are listed in the Variables selected list. The input type for each variable type is defined as following:
|
Variable |
Input Type |
Description |
||
|---|---|---|---|---|
|
Position |
3 element vector eg. [x y z] |
The position vector controls the translation of the actor. The translation is in units. Keep in mind numerical accuracy. |
||
|
Orientation |
3 element vector eg. [roll pitch yaw] |
The rotation vector controls the orientation of the actor. Rotations occur in the order of roll (x), pitch (y), and then yaw (z). The units are in radians. If you want to change the order or use a different set of rotations, you can either insert a series of dummy actors in a parent-child hierarchy, or you can compose the transformation matrix directly. |
||
|
Scale |
3 element vector eg. [x y z] |
The vector controls the scale of the actor. A scale of [1 1 1] is the original size of the mesh. Setting any scale element to zero will flatten the mesh along that axis. Note, scale values between 0 and 0.001 will be saturated to 0.001, and values less than 0, but greater than -0.001 will be saturated to -0.001.
|
||
|
Transform |
4x4 matrix eg. [1 0 0 0; |
The transformation matrix is a homogeneous transformation that includes translation, rotation, and scale. Note that the use of this input will supersede any translation, rotation, or scale inputs used for the particular actor. See the composing your own transformation matrix page for more information on the helper functions and theory.
|
||
|
Color |
4 element vector eg. [r g b a] |
The color vector controls the material base color in red, green, and blue components (r g b) and the transparency or alpha (a) of the actor. If the actor does not have any texture map applied to it, then the actor will take on this color. If the actor does have a texture map applied, then the resulting color will be the multiplication of this color to the color of each texel (pixel) of the texture map. To have a texture map appear in the original colors, use a color vector of [1 1 1 1]. All color elements are on a scale of 0 to 1. |
Sample time
This is the maximum rate at which the server will update the clients with the data. The actual update rate will be subject to the volume of data transmitted and the number of connected clients. See the Visualization Initialize reference page for more information.
Targets
|
Target Name |
Compatible* |
Model Referencing |
Comments |
|---|---|---|---|
|
Yes |
Yes |
||
|
Yes |
Yes |
||
|
Yes |
Yes |
||
|
Yes |
Yes |
||
|
Yes |
Yes |
||
|
Yes |
Yes |
||
|
Yes |
Yes |
||
|
Yes |
Yes |
||
|
Yes |
Yes |
||
|
Yes |
Yes |
||
|
Yes |
Yes |
||
|
Yes |
Yes |
||
|
Yes |
Yes |
||
|
Yes |
Yes |
Last fully supported in QUARC 2018. |
|
|
Rapid Simulation (RSIM) Target |
Yes |
Yes |
|
|
S-Function Target |
No |
N/A |
Old technology. Use model referencing instead. |
|
Normal simulation |
Yes |
Yes |
See Also
Copyright ©2026 Quanser Inc. This page was generated 2026-05-13. Submit feedback to Quanser about this page.
Link to this page.
