
Basic Procedures
Once the initial configuration of QUARC is complete, models may be created, built and then run on target machines. The first step after creating a Simulink model is setting the configuration parameters. After these parameters are set, the model can be built and run on the specified target via external (real-time) mode or run as a normal simulation. The model may be stopped at any time. This section explains the procedures involved in configuring, building and running a model. It also provides information on the difference between running a model in real-time and simulating a model. The following list may be used to refer to each topic:
Configuring a Model
Once a new model is created in Simulink, the configuration parameters must be set to the desired settings, unless the defaults are suitable. This section includes a brief explanation of the parameters that are crucial for building and running models: the Solver parameters and the System target file in the Code Generation pane. A detailed explanation of all the configuration parameters is an advanced topic and is out of the scope of this section. For more information on all of the configuration parameters except the parameters under the Code Generation/QUARC pane, refer to the Configuration Parameters Dialog Box MATLAB Command Line Click to copy the following command line to the clipboard. Then paste it in the MATLAB Command Window: qc_open_matlab_help('config_parameters') discussion in the Simulink documentation. The Code Generation/QUARC pane is added to the configuration parameters by QUARC, so a detailed discussion may be found in the Code Generation Pane - QUARC section in the QUARC documentation.
There are two ways of accessing the configuration parameters. The first method is to use the Configuration Parameters dialog by clicking on the MODELING tab, and then clicking on the item or by pressing Ctrl+E.

The other method of accessing the configuration parameters is to use Model Explorer. To open Model Explorer, select from the MODELING tab, or press Ctrl+H. You may have to make the model a little wider to see the full toolbar.

Once in Model Explorer, expand the node for your model in the treeview in the Model Hierarchy pane as shown below and click on the item under it. If you have renamed the configuration then click on the name of the configuration. Then click on the button to open the Configuration Parameters dialog.
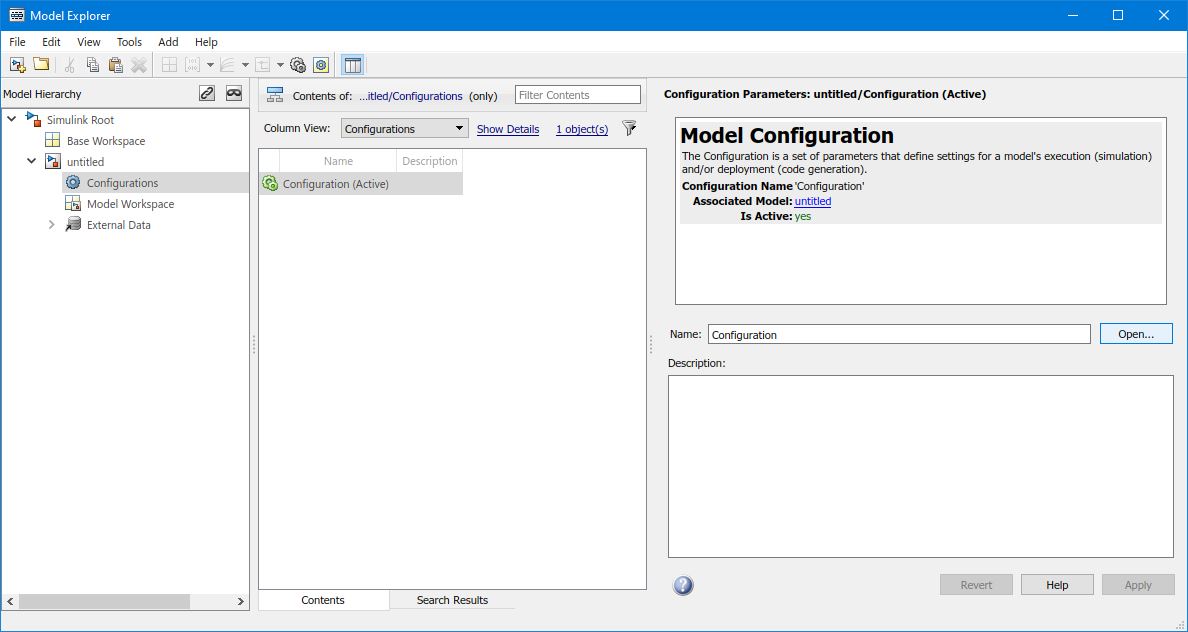
The Configuration Parameters dialog is the easiest way to access the configuration parameters and is the most familiar to those who have used Quanser's WinCon product. Model Explorer provides more flexibility than the Configuration Parameters dialog, however, in that it allows more than one set of configurations to be specified for the model.
The Solver parameters are described below along with an illustration of the Solver
pane when the solver type is set to Fixed-step. If the solver type
is changed from Fixed-step to Variable-step,
the Solver pane will display different parameters. Since only the fixed-step solver is
supported for code generation, this section focuses on the parameters for the fixed-step
solver. Note, however, that the variable-step solver may be used for simulation.
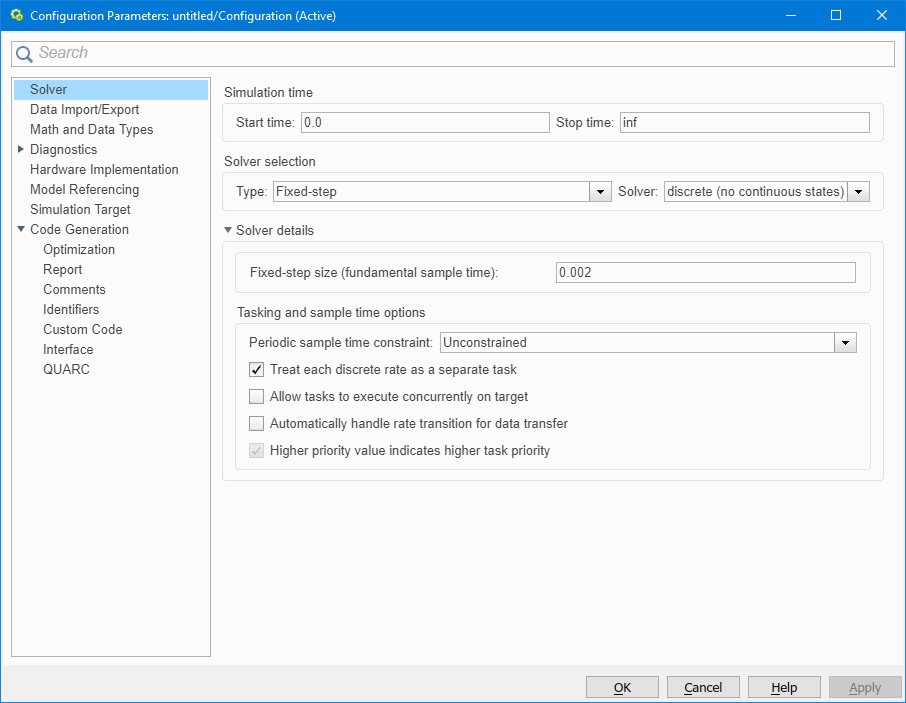
Start time
A double-precision value indicating the start time for the simulation
or generated code in seconds. The default value is 0.0. Any value greater than
0.0 represents an offset, which should be less than or equal to
Stop time. This value is very rarely changed and is typically
only used to continue a simulation from a previous run, in which the state of the previous
run is used to initialize the state of the new simulation.
Stop time
A double-precision value specifying the stop time for the simulation
or generated code in seconds. The default value is inf, meaning the model runs
forever unless stopped by the user. This parameter should always be greater than
or equal to the Start time. If the parameters are equal,
the simulation or the generated real-time code runs for one step.
Type
The type of solver used to simulate the model. There are two solver types: fixed-step and variable-step. The fixed-step solvers have a constant integration step size while the step size varies when using the variable-step solvers according to the dynamics of the model. For a more detailed description, please refer to the Solver Type MATLAB Command Line Click to copy the following command line to the clipboard. Then paste it in the MATLAB Command Window: qc_open_matlab_help('solver_type') section in the Simulink documentation. Note that the fixed-step solver must be used for code generation.
Solver
The solver you want to use to compute the model's state during simulation or code
generation. The solver selection changes according to the type of solver specified above. Since the
focus of this section is on fixed-step solvers, we examine solvers of this type. The Solver
list includes solvers for models containing continuous states and a discrete solver
for models containing no states or discrete states only. Note that the fixed-step
discrete solver cannot be used for simulating models that contain continuous states.
For models containing continuous states, ode1 (Euler) is commonly used
if there is no need for higher level solvers, because it yields faster simulation
times and less computation time in real-time code. A detailed discussion on all of the
fixed-step solvers may be found in the
Fixed-step Solvers
MATLAB Command Line
Click to copy the following command line to the clipboard. Then paste it in the MATLAB Command Window:
qc_open_matlab_help('solver') section in the Simulink documentation.
Fixed-step size (fundamental sample time)
The integration step size used by the fixed-step solvers to compute the next state of the model.
It is also the fundamental sampling time used to simulate the model and to run
the real-time code generated from the model. The default value is 1 ms.
Many of the QUARC targets support rates that are faster than 1 ms, even
for the QUARC system timebase.
Sampling rates of 2 ms or slower perform best on the Windows target. However, the QUARC Windows
target is now capable of sampling rates faster than 1 ms when using the experimental
fast system timer on multiprocessor or multicore platforms.
Still, hardware-based timing is much more efficient than the fast system timer on the QUARC Windows target and has
less impact on other applications in the system. Hence, hardware-based timing continues to be the recommended option
for the Windows target.
Tasking mode for periodic sample times
This field specifies the way models with periodic sample times should work. There are three
modes: Auto, Single tasking and Multitasking.
In Auto mode, QUARC decides whether the model should be handled using
single-tasking or multi-tasking mode based on the number of sample times in the model.
If there is only one sample time used throughout the blocks in the model, QUARC
chooses single-tasking for that particular model. On the other hand, if the blocks
in the model have different sample times, QUARC divides the blocks into different
groups, or tasks, based on their sample times. Each task runs in a separate thread
that executes at the sample time associated with that task. This mode of operation is called
multithreading and is a new feature supported by QUARC. Multithreading is advantageous because
it allows slower tasks to run for longer than the fundamental sample time without
interfering with the sample rate of faster tasks. The only restriction is that the
computation time of blocks within a particular task must be less than the
sample time of that task, or sampling instants may be missed by that task.
For more information on multithreading, please refer to the
Multithreading section.
In Single tasking mode, models with one sample time run in one
thread with no restrictions. Models with multiple sample times also run in
one thread, in this case. However, there is one restriction: the computational time
for the model, including both the faster and slower blocks, must be less than the
fundamental sample time. Otherwise, the slower blocks may
not finish executing before one time step has expired and sampling instants will be missed.
This restriction differs from the multithreading scenario in the fact that in Multi tasking
mode the computation time of the blocks of a particular sample time must be less
than the sample time of that set of blocks; the slower blocks may take longer
to run than the fundamental sample time of the model.
The advantage of using single-tasking mode for models with multiple rates is avoiding
the use of the Rate Transition block throughout the model. This block is required
to connect blocks with different sample rates. Please refer to the
Rate Transition
MATLAB Command Line
Click to copy the following command line to the clipboard. Then paste it in the MATLAB Command Window:
doc('Rate Transition') block reference page for more details.
Note that the description of the last two parameters in the Solver pane is out of the scope of this discussion. For information on these topics, please refer to the Automatically handle data transfers between tasks MATLAB Command Line Click to copy the following command line to the clipboard. Then paste it in the MATLAB Command Window: qc_open_matlab_help('solver_auto_insert_rate_transition') and Higher priority value indicates higher task priority MATLAB Command Line Click to copy the following command line to the clipboard. Then paste it in the MATLAB Command Window: qc_open_matlab_help('solver_positive_priority_order') sections in the Simulink documentation.
Below is a description of the System target file parameter in the Code Generation pane and an illustration of that pane.
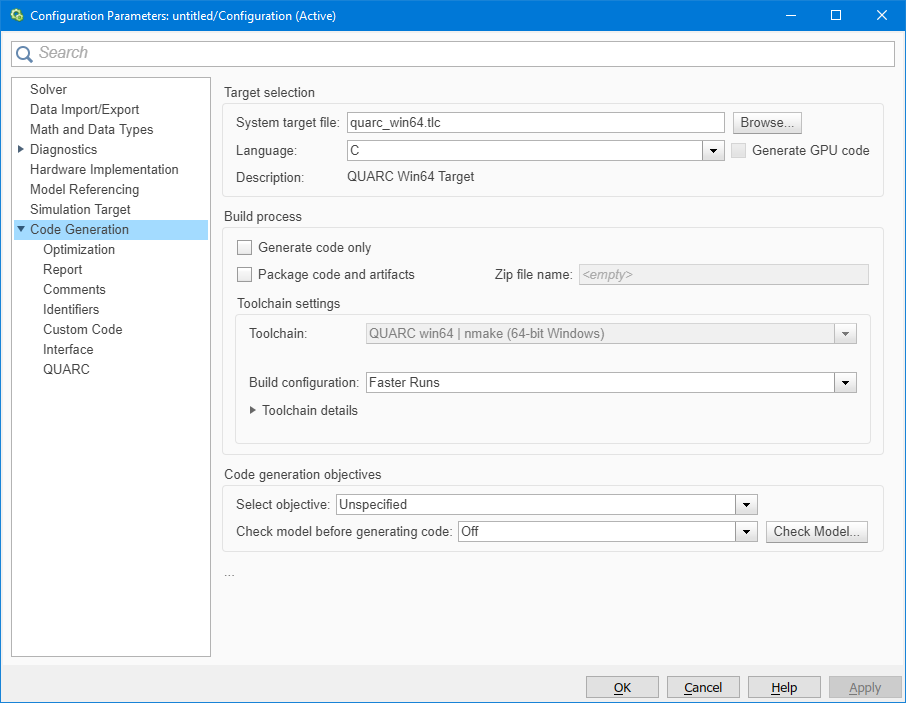
System target file
This field specifies the target file to be used for code generation. The target file determines the type of target for which code will be generated, such as the QUARC Windows target.
To configure the target type, click on the Browse button which is located to the right
of the System target file field. A list of target files
opens up as shown below. Choose a target type among the list of target files. Once the right target
file is chosen, click on OK. The configuration parameters are saved with the model, so the system target file
only needs to be configured once for each model. The default system target file is quarc_win64.tlc,
indicating the QUARC 64-bit Windows target.
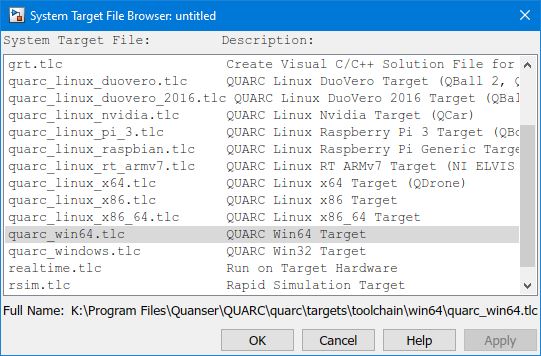
Along with the target types supplied by QUARC (e.g. Windows, Linux), the Rapid Simulation (RSIM)
target is also fully supported by QUARC. The system target file for the Rapid Simulation
target is rsim.tlc. The Rapid Simulation target may be used to run fast
and optimized simulations of models with hybrid dynamics and models that use variable-step
solvers. The code generated for the Rapid Simulation target does not run in real-time at
a fixed sample rate. It is purely for simulation. However, almost all of the blocks provided
by QUARC are supported with the Rapid Simulation target, just as they are supported in normal
simulation. For further details about the Rapid Simulation target, please refer to the
Running Rapid Simulations
MATLAB Command Line
Click to copy the following command line to the clipboard. Then paste it in the MATLAB Command Window:
qc_open_matlab_help('rsim') section in the Code Generation documentation.
For more information on the System target type parameter, please refer to the Code Generation Pane - General section of the QUARC documentation.
The rest of the parameters in the Code Generation pane are out of the scope of this section. Please refer to the Configuration Parameters - Code Generation Pane MATLAB Command Line Click to copy the following command line to the clipboard. Then paste it in the MATLAB Command Window: qc_open_matlab_help('rtw_pane') section of the Code Generation documentation for more information. You can refer to the Code Generation Pane - QUARC section in the QUARC documentation for a description of the parameters in the QUARC pane and for parameters such as the MEX-file arguments that are important for more advanced usage of QUARC.
External Mode vs. Normal Simulation
In normal simulation, Simulink simulates the blocks in the model. The simulation does not run in real-time (unless QUARC's System TimeBase block is used) and the simulation runs as part of MATLAB. When real-time code is generated from the model using QUARC, the real-time code runs independently of MATLAB and may even be run on a different computer or embedded system. The machine running MATLAB will be referred to as the host and the system running the real-time code will be called the target. The host and target may be the same machine, depending on the target type for which the real-time code was generated.
External mode
QUARC extends the capabilities of Simulink to allow it to both run and communicate with the real-time code directly from the Simulink diagram for the model. Scopes and other display blocks in the model can plot signals produced within the real-time code or stream it to disk, and parameters within the real-time code may be modified directly from Simulink just be changing parameters of the blocks within the model window - all while the real-time code is running! These capabilities are all enabled through a special mode called external mode. It is called external mode because in this mode Simulink does not run the simulation. Instead, it communicates with the target and the real-time code running on that target - external to Simulink - through a transport layer provided by QUARC. The real-time code streams data from its internal signals to the Simulink model window through this transport layer. Likewise, the Simulink model window sends any parameter changes to the real-time code through this transport layer. The real-time code then modifies the variables associated with those parameters, allowing those parameters to be changed without recompiling the model! Many other capabilities are provided by QUARC to make the interface between the Simulink model window and the real-time code so seamless, you may just forget the real-time code is running on the target! Simulink may be running on the same machine as the real-time code or a different computer - all of the data streaming and online parameter tuning capabilities of QUARC are still available.
For a detailed discussion on parameter tuning, please refer to the Parameter Tuning section in the QUARC documentation. The Data Collection section in the QUARC documentation provides more information on the data streaming facilities of QUARC. For further detail on external mode, please refer to the External Mode section in the Code Generation documentation.
Normal mode
Normal simulation is useful for developing a control system and observing its behavior before actually building and running it on the target in real-time. Once the model is created in the model window, the simulation can be run. Using normal mode saves time because you do not need to build your model every time you make changes to it, such as adding or removing blocks. However, the model does not run in real-time. QUARC does supply a special block called the System Timebase block that forces the normal simulation to run in "real-time" (so that one second of simulation corresponds to one second of actual time), but the performance is not as good as real-time code and parameter tuning sometimes pauses the simulation - unlike external mode. Hence, Quanser recommends that external mode be used with generated code for real-time execution of the model.
Nevertheless, all the QUARC blocks support normal simulation mode unless otherwise documented. A notable exception is the Hardware-In-the-Loop (HIL) blocks, which do not allow access to hardware in normal simulation for safety reasons, since controller stability is generally dependent on having an accurate real-time sampling period.
Changing modes
Starting with MATLAB R2019b, Simulink has separated the Simulation mode and External mode into different tabs on the Simulink toolstrip.
Simulation mode is controlled via the SIMULATION tab.

External mode is controlled via the HARDWARE tab.

You can choose between the SIMULATION and HARDWARE tabs to use normal simulation or external mode, respectively.
Depending on the status of the simulation or the real-time code, different buttons become available in each tab to control the simulation or real-time code execution.
External Mode Operation
One Step Process
Starting with MATLAB R2019b, Simulink has greatly simplified building, downloading, connecting, starting, stopping, and disconnecting of real-time code with external mode operation.
To build, download, connect, and start the model for real-time external operation, click the button on the HARDWARE tab.

If the model is successfully built and downloaded to the target. Simulink will automatically connect and start the real-time code on the target and the button will automatically change to a button.
To stop the real-time code execution, click the button on the HARDWARE tab and Simlink will stop the real-time code on the target and disconnects from the target.

Step by step Process
Simulink also allows a step-by-step approach in deploying models to hardware.
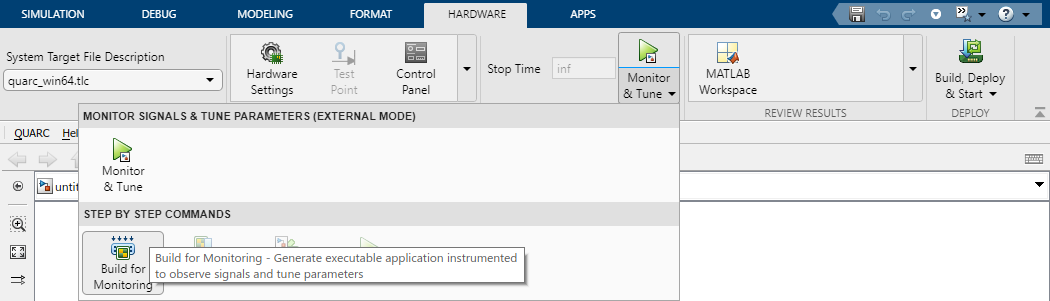
Building a Model
To build the model to generate real-time code, click the bottom of the button and then the button on the HARDWARE tab.
In this step, Simulink simply examines the model and creates a database decribing everything in the model. Then the database is used to generate C/C++ code for the model. The generated code is then compiled using the specific tools for the target. The compiled real-time code still resides on the host computer.
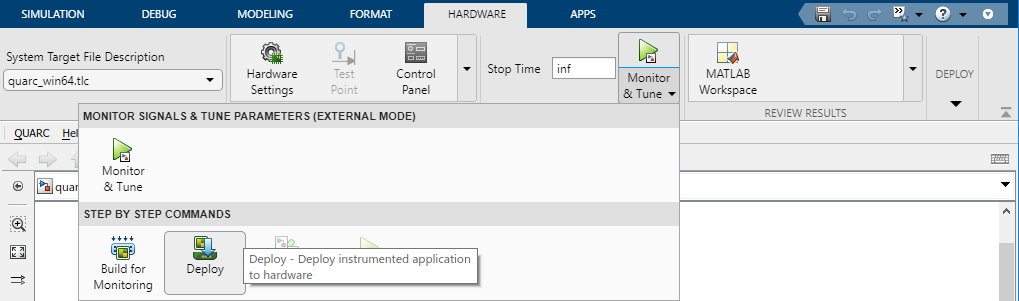
Deploying real-time code
To deploy the generated real-time executable (i.e. download it to the target), click the bottom of the button and then the button on the HARDWARE tab.
In this step, the generated real-time executable is downloaded to the target and the model is started in a state that waits for the host Simulink model to connect to it.
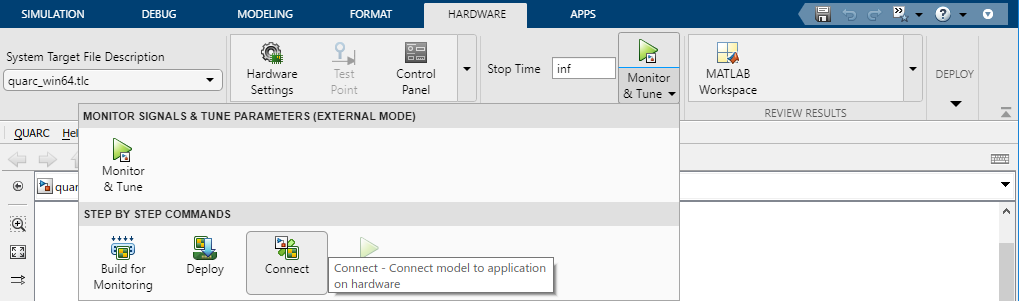
Connecting to a Model's Real-Time Code
To connect to the generated real-time executable on the target, click the bottom of the button and then the button on the HARDWARE tab.
In this step, Simulink connects to the real-time executable on the target via external mode communication. The real-time executable is then ready to be started.
Starting a Model
To start the generated real-time executable on the target, click the button on the HARDWARE tab.
In this step, the generated real-time executable would start running on the target.

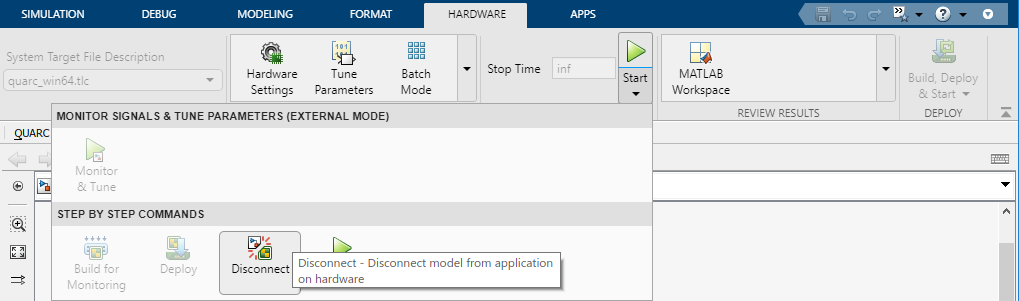
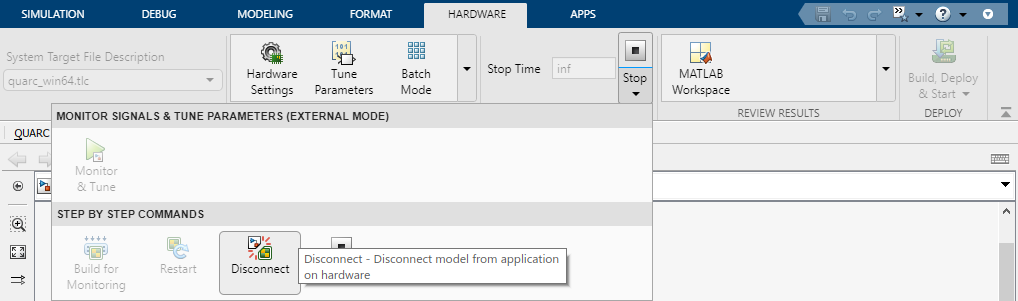
Disconnecting from a Model's Real-Time code
Anytime Simulink is connected to the target, it is possible to disconnect Simulink's external communication with the real-time executable. Note that disconnecting Simulink with the real-time executable would just leave the real-time executable to be in the last state that it was in.
To disconnect the target from Simulink , click the bottom of the or button and then the button on the HARDWARE tab.
Stopping a Model
To stop the generated real-time executable on the target, click the button on the HARDWARE tab.
In this step, the generated real-time executable would stop running on the target, and Simulink would automatically disconnect from the target as well.
Copyright ©2026 Quanser Inc. This page was generated 2026-05-13. Submit feedback to Quanser about this page.
Link to this page.