
Streaming to Disk
QUARC supports a variety of methods for streaming data to disk during real-time execution or in normal simulation. The data is stored in a MAT-file (a standard MATLAB binary file format). Storing data directly on disk is useful for archiving data from various runs, for transferring the data to another computer and for post-analysis. The MAT-file may be imported into the MATLAB workspace where MATLAB functions may be used to analyze or plot the data. There are five methods for streaming data to disk:
In external mode, the first three techniques save the data to a file on the host, even when the real-time code is running on a remote target. They also support signal triggering in external mode. Thus, if desired, saving of the data to disk can be initiated by a trigger signal in the model itself, or be manually triggered at any time. For more information on signal triggering, please refer to the Signal Triggering section of this documentation.
The last two methods save the data to a MAT-file on the target when running in external mode. They do not support signal triggering. The table below summarizes the four methods.
|
Method |
Supported Modes |
Signal Triggering |
Location of MAT-File |
|---|---|---|---|
|
Data Archiving |
Real-Time only |
Yes |
Host |
|
To Host File block |
Real-Time and Normal Simulation |
Yes |
Host |
|
Model Logging |
Real-Time and Normal Simulation |
Yes |
Host |
|
To File block |
Real-Time and Normal Simulation |
No |
Target |
|
MAT-File Logging |
Real-Time only |
No |
Target |
Data Archiving
You can use the "Data Archiving" feature of the External Mode Control panel to stream data to disk in external mode only. In order for the "Data Archiving" feature to be able to stream data to disk, the data must be saved to a variable in the MATLAB workspace first. The saved variable can then be stored in a MAT-file on disk. Therefore you need to use one of the methods of streaming data to the workspace discussed in the Streaming to Workspace section. Once the data are saved to a variable in the workspace, the "Data Archiving" feature can be used to save that variable to a MAT-file. This "data archiving" process saves the MAT-file on the host machine. In addition, this method also supports signal triggering, which is discussed in the Signal Triggering section.
Please perform the following steps to save data from the workspace to a MAT-file on disk:
Go to the menu item in the model window. The External Mode Control panel should appear. Below is an illustration of this panel.
Click on the button on the panel. A new dialog called External Data Archiving should open. This dialog should look similar to the figure below.
Click on the check box associated with the parameter called Enable data archiving. This enables data archiving. Notice that the disabled fields in the dialog become enabled as well. The next figure illustrates the dialog with data archiving enabled.
You can specify the name of the directory and the actual MAT-file in the Directory and File parameters respectively. Specify the desired values. Note that if you have not set up your model to save data to a variable in workspace, the directory and the MAT-file will get created, but the MAT-file will be empty.
For each execution of the model, a new MAT-file is created and saved. The suffix appended to the file name is incremented each time. For example, if you choose "test" for your file name then after the first execution, a MAT-file is created with the name "test_0.mat". After the second execution of the model, another MAT-file is created with the name "test_1.mat" and so forth. This automatic file naming is beneficial because the MAT-files do not get overwritten with every new execution of the model and so the results of sequential executions of your model may be compared.
However, the variables saved in all the MAT-files have the same name by default. To change this behavior, you need to enable the parameter called Append file suffix to variable names. Doing so results in different names for each MAT-file's variables. For example, if you have one variable named "outdata" in your model, it would be saved as "outdata_0" in the first MAT-file with the name "test_0.mat" and as "outdata_1" in the second MAT-file with the name "test_1.mat" and so forth. Enabling this parameter is very useful when you want to import the data from the MAT-files into the workspace because the variables from the different MAT-files do not overwrite each other.
Click on for the changes to take effect. If you want to go back to the previous settings for the Data Archiving parameters, click on .
Note: The other parameters in the dialog are related to Signal Triggering and are out of the scope of this section. Please refer to the Data Archiving MATLAB Command Line Click to copy the following command line to the clipboard. Then paste it in the MATLAB Command Window: qc_open_matlab_help('data_archiving') section in the Code Generation documentation for more details.
Now if you run your model in real-time, a directory and a MAT-file with the naming specified are created in the current MATLAB working directory on the host machine. With each execution, a new MAT-file will be created as mentioned earlier. Note that you do not need to rebuild your model every time you change the Data Archiving parameters. However, you do need to rebuild the model if you make changes to the settings for saving variables to the workspace. Otherwise, Simulink complains that the model checksum is invalid and the code needs to be rebuilt before it can be run.
Using the To Host File Block
The To Host File block belongs to the QUARC Targets/Sinks/To Host MATLAB Command Line Click to copy the following command line to the clipboard. Then paste it in the MATLAB Command Window: qc_open_library('quarc_library/Sinks/To Host'); category in the Simulink Library Browser. It can be used to stream data to disk on the host machine, as the name suggests. You do not need to save any variables into the workspace and then save them to disk. All you need to stream data to disk using this method is to insert as many of these blocks as required. The To Host File block creates a single variable in the file containing the data from the signal attached to its input. This block streams data to disk on the host machine in either normal simulation or external mode. It also supports signal triggering in external mode as discussed in the Signal Triggering section. For more information about this block, please refer to the To Host File block reference page in the QUARC documentation.
Please perform the following steps in order to stream data to disk using the To Host File block.
Insert a To Host File block for each signal for which you want to collect data. Signals may also be multiplexed into a vector to save the data to a single To Host File block (and thus a single file). Double click on the block in the model window. The block parameters dialog looks similar to the figure below.
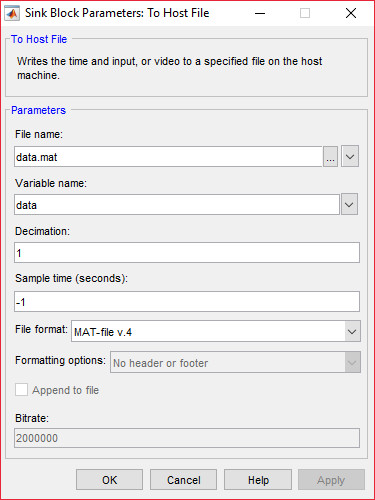
The first parameter in the dialog, called File name, specifies the name of the file to be
created. The default name used is data.mat. Change it to any desired name. Note that if you choose the same filename
for multiple blocks, the last block to save its data will overwrite the variables saved by other blocks in the file. Hence, a
unique filename should be chosen for each To Host File block. The To Host File block
supports special format specifiers in the file name for inserting the model name, date or time, etc. Refer to the
To Host File block reference page for details.
The second parameter, called Variable name, specifies the name of the variable to which
you want to save data. This variable gets saved in the file. The default name is data. Change it to the desired name.
Note: Always use different variable names for each To Host File block in the model. Using the same variable name would cause the variable to be overwritten as each file is imported into the MATLAB workspace when you try to analyze the data afterward. The To Host File block supports special format specifiers in the variable name for inserting the date, time or an instance counter, etc. Refer to the To Host File block reference page for details.
The next parameter in the dialog is Decimation, which is the decimation factor. The block
writes data to the file every nth sample, where n is the decimation factor.
The default value is 1, meaning the block saves data to the file every time step. Change it to the desired value.
The parameter below this one is called Sample Time. The default value is -1, which causes the sample
time to be inherited from the input signal. This value is sufficient for most applications and should be left as is.
The next parameter is the File format, which determines the format of the file to be written. Several formats are currently supported: MAT v.4 format (compatible with MATLAB versions 1 and up), MAT v.5 format (compatible with MATLAB versions 5 and up), M-file format (compatible with any MATLAB version), CSV format (comma-separated variables, compatible with spreadsheets), text file format and raw binary format (useful for interfacing to C applications). MAT v.4 is the default format. Change the file format to the desired one. Note that if the MAT-file is opened in MATLAB and then saved again it will be saved in the format compatible with the user's MATLAB version.
Note: If you use the same filename for multiple blocks, the last block to save data overwrites the data saved by the other blocks, in the case where all the blocks use the same file format. If you have multiple blocks using the same filename but different file formats, the final file may be corrupted and you will not be able to access even the last block's data saved in the file. Therefore, it is recommended that a different filename always be used for each To Host File block.
Click .
After changing the To Host File block parameters, you must rebuild the model in order to be able to run the real-time code. In normal simulation, you need only save the model and run the simulation. Once you run your model, the MAT-file gets created in the current MATLAB working directory.
The To Host File works in a similar manner to the To File block in the Simulink/Sinks category of the Simulink library. The primary differences between the two blocks are:
The To Host File saves the file to the host machine while the To File block saves the created file to the target machine. Since you often want to perform analysis of your models' outputs from the host machine, it is better to use the To Host File block for this purpose.
The To Host File block supports signal triggering while the To File block does not have support for this feature.
Model Logging
Doing research and development often requires repetitive runs of a model. Keeping track of these runs is easy with QUARC's model logging feature. When model logging is configured, QUARC creates a file whenever a model is run that shows when the model was started and stopped, when block parameters were changed, and any user-defined messages logged using the Log Message block. It also logs any error messages that occur, even when they stop the model. Such error messages usually appear in the Simulink Diagnostics dialog, yet QUARC's model logging facility is able to record these messages to the model log file. A simple example of a log file is shown below:
            07/19/10 11:44:25: Connecting to model test_log_message
            07/19/10 11:44:25: Connected to model test_log_message
            07/19/10 11:44:25: Setting block parameters
            07/19/10 11:44:26: Starting model test_log_message
            07/19/10 11:44:32: Limit hit of 3.1415926!                       <= user-defined message using Log Message block
            07/19/10 11:44:34: Stopping model test_log_message
            07/19/10 11:44:34: Disconnected from model test_log_message
In addition to creating a log file, QUARC's model logging feature can also make a unique copy of the model itself each time the model is run. Hence, all the information required to repeat the experiment is logged.
Automatic Logging
QUARC allows logging to be performed automatically for all models. To enable logging for all models, use the QUARC Preferences dialog. Click on the menu item of any model to open the QUARC Preferences dialog. Then select the Logging tab, as illustrated below:
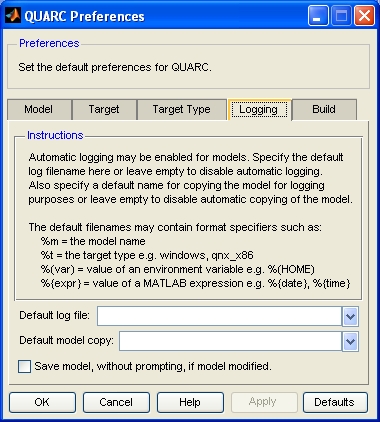
In the Default log file field, enter the name of the file name to use for logs. Since this file name will be used for all models, QUARC provides the ability to use special format specifiers to tailor the file name to each model automatically. For example, use the %m format specifier to insert the name of the model into the log file name. Other convenient format specifiers are %{date} and %{time}, which insert the date and time at which the model is started. Hence, a new log file can be created each time a model is run that is automatically marked with the date and time, so that a complete history of your work can be recorded. A typical value for the Default log file field is "%{date}/%m_%{time}.log". Note that QUARC will create any intermediate directories that do not exist when it records the log.
In the Default model copy field, enter the name of the file name to use for copying the model. QUARC will copy the model to the given location every time the model is run. Since this file name will be used for all models, QUARC provides the ability to use special format specifiers to tailor the file name to each model automatically. The same format specifiers available for the Default log file field may be used here. For example, a typical value for the Default model copy field is "%{date}/%m_%{time}.mdl". In this case, a copy of the model will be stored in a subdirectory specific to the current date, and the name of the model will include the time at which the model was run. Note that QUARC will create any intermediate directories that do not exist when it copies the model.
Note that Simulink also supports source code control systems so that model revisions can be committed to source code control. However, there is no automated mechanism at present to committing the model to source code control at the start of each run.
Press to accept the new preferences settings and close the QUARC Preferences dialog. A log file and/or copy of the model will now be generated whenever a model is run. Note that log information is appended to the log and does not overwrite the log. The copy of the model, on the other hand, will overwrite any extant file.
Refer to the QUARC Preferences section for more details.
Per-Model Logging
Sometimes it is preferable to only turn on logging for a single model. QUARC permits logging to be enabled for one model only via the MEX-file arguments. The easiest way to configure logging for a single model is to select the menu item of the model or to use the button on a Log Message block. Either action opens the Set Model Log File dialog shown below:
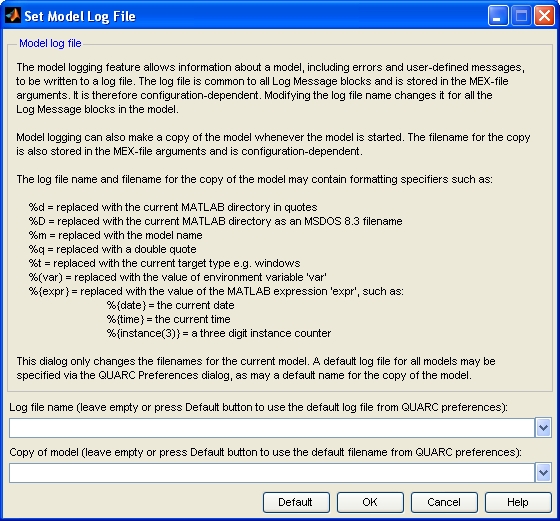
Enter the name of the log file for the model in the Log file name field of the Set Model Log File dialog and enter the name of the model copy in the Copy of model field. The same format specifiers available in the QUARC Preferences dialog for the log file name and model copy file name are available here. If the Log file name field is not empty then a log file will now be generated each time the model is run. Likewise, if the Copy of model field is not empty then the model will be copied each time the model is run. Note that log information is appended to the log and does not overwrite the log. However, the copy of the model will overwrite any extant file.
Press to save the changes to the model.
Refer to the Set Model Log File dialog help page for details, such as the format specifiers available for log file names.
Using the To File Block
The To File block belongs to the Simulink/Sinks category of the Simulink library. It can be used to stream data to disk on the target machine. You do not need to save any variables to the workspace and then save them to disk. All you need to stream data to disk using this method is to insert as many of these blocks as required. The To File block creates a single variable in the MAT-file containing the data from the signal attached to its input. This block streams data to disk on the host machine in normal simulation and to the target machine in external mode. It does not support signal triggering in external mode. For more information on this block, please refer to the To File MATLAB Command Line Click to copy the following command line to the clipboard. Then paste it in the MATLAB Command Window: doc('To File') block reference page in the Simulink documentation.
Please perform the following steps in order to stream data to disk using the To File block.
Insert a To File block for each signal for which you want to collect data. Signals may also be multiplexed into a vector to save the data to a single To File block (and thus a single MAT-file). Double click on the block in the model window. The block parameters dialog looks similar to the figure below.
The first parameter in the dialog, called Filename, specifies the name of the MAT-file to be
created. The default name used is untitled.mat. Change it to any desired name. Note that if you choose the same filename
for multiple blocks, Simulink will give an error message complaining about filename duplication in two or more blocks.
The second parameter, called Variable name, specifies the name of the variable to which
you want to save data. This variable gets saved to the MAT-file. The default name is ans. Change it to the desired name.
Note: Always use different variable names for each To File block in the model. Using the same variable name would cause the variable to be overwritten as each MAT-file is imported into the MATLAB workspace when you try to analyze the data afterward.
The next parameter in the dialog is Decimation, which is the decimation factor. The block
writes data to the MAT-file every nth sample where n is the decimation factor.
The default value is 1, meaning the block
saves data to the MAT-file every time step. Change it to the desired value. The parameter below this one is called
Sample Time. The default value is -1, indicating that the sample
time is inherited from the input signal. This value is sufficient for most applications and should be left as is.
Click on .
After changing the To File block parameters, you must rebuild the model in order to be able to run
the real-time code. In normal simulation, you need only save the model and run the simulation. Once you run your model, the MAT-file
gets created in the current MATLAB working directory in normal simulation, and in the current working directory of the model on the
target machine in external mode. The current working directory of the real-time code on the target machine is determined by the
-d option passed to the model when the model is run on the target. The arguments passed to the model are specified
in the MEX-file arguments parameter of the Code Generation
/Interface pane of the Configuration Parameters dialog. The figure below is an illustration of the Code Generation/Interface pane.
If you look at the MEX-file arguments parameter in this pane, the first string in this parameter is
the arguments passed to the model when the model is invoked on the target. There are a variety of options passed in the model arguments
by default. There is a -d option with which you specify the current working directory for the model. This directory will be
the folder in which the MAT-file will be saved. For the Windows target, the default value for this option is %d,
which sets the directory to the current MATLAB working directory. This value is suitable for the case where the host and target are
the same machine. For the Linux targets, the default value is /tmp, indicating that the MAT-file will be stored in the
/tmp directory on the target machine.
To change this directory to the desired one, change the -d option to the desired directory on the target machine.
For example, if you want to save the MAT-file in a directory called mydata on the C drive on the target, enter "-d C:\mydata". For more
information on the MEX-file arguments, please refer to the MEX-File Arguments section in
the QUARC documentation.
See the preceding discussion of the To Host File block for a comparison between the To File block and the To Host File block.
 The To File block has a bug in MATLAB R2007a. If you use the same machine as both
host and target, the block may empty the contents of the MAT-file as soon as you stop the real-time code. Therefore, it
is strongly recommended that the To Host File block be used rather than the
To File block when using MATLAB R2007a. Upgrading to MATLAB version R2007b or later
resolves the issue.
The To File block has a bug in MATLAB R2007a. If you use the same machine as both
host and target, the block may empty the contents of the MAT-file as soon as you stop the real-time code. Therefore, it
is strongly recommended that the To Host File block be used rather than the
To File block when using MATLAB R2007a. Upgrading to MATLAB version R2007b or later
resolves the issue.
MAT-File Logging
MAT-File logging is a built-in feature from Simulink that is fully supported by QUARC. This method can be used to stream data to disk on the target machine. It only supports external mode and does not support signal triggering. Please perform the following steps in order to log data to disk using MAT-file logging:
Open the Configuration Parameters dialog using one of the ways mentioned in the Configuring a Model section in the QUARC documentation. Click on the Code Generation/Interface pane. This pane should look similar to the following figure.
The parameter MAT-file logging enables MAT-file logging. Enable it by selecting the checkbox beside it.
Variable names are prefixed with the string "rt_" by default. Select the the "_rt" option instead from the MAT-file variable name modifier popup menu adjacent to the MAT-file logging option to append a suffix to variable names instead. Or choose "none" to use the names without modification.
Click on .
Note: In order to specify how the MAT-file should be created (e.g. variable names and format), please refer to the Using the Data Import/Export Pane in this documentation.
Since this method only supports external mode, the model must be rebuilt after applying the changes. When the model is run in real-time,
a MAT-file is created with the name model.mat, where model is the name of the current model. The MAT-file gets created
on the target machine in the directory specified using the -d option in the MEX-file arguments
parameter in the Code Generation/Interface pane of the Configuration Parameters dialog. Refer again to the figure above depicting the
Code Generation/Interface pane.
If you look at the MEX-file arguments parameter in this pane, the first string in this parameter is
the arguments passed to the model when the model is invoked on the target. There are a variety of options passed in the model arguments
by default. There is a -d option with which you specify the current working directory for the model. This directory will be
the folder in which the MAT-file will be saved. For the Windows target, the default value for this option is %d,
which sets the directory to the current MATLAB working directory. This value is suitable for the case where the host and target are
the same machine. For the Linux targets, the default value is /tmp, indicating that the MAT-file will be stored in the
/tmp directory on the target machine.
To change this directory to the desired one, change the -d option to the desired directory on the target machine.
For example, if you want to save the MAT-file in a directory called mydata on the C drive on the target, enter "-d C:\mydata". For more
information on the MEX-file arguments, please refer to the MEX-File Arguments
section in the QUARC documentation.
With each execution of the real-time code, the MAT-file gets overwritten by the new MAT-file. With MAT-file logging, the MAT-file created contains all the variables in the workspace saved by any of the methods used to save data to the MATLAB workspace discussed in the Streaming to the MATLAB Workspace section. It also saves data written to Outport blocks at the root level of the model. This functionality is useful because a single MAT-file stores all the data needed rather than requiring one MAT-file per signal, as is the case with the To Host File and To File blocks.
Copyright ©2026 Quanser Inc. This page was generated 2026-05-13. Submit feedback to Quanser about this page.
Link to this page.